Getting things ready
Before we start our lesson we have to get a few
things ready . Follow the below steps to open your
resource documents , new document, photograph etc...
Step 1: download your resource files
Download the source files from this link : [resources].
This file consists of 4 files : "animalbox.psd","flowerbox.psd",backgroundbox.psd",
and "facebox.psd" which have been compressed
( zipped) .These files have a variety of backgrounds
, facial parts ,flowers and animals for you to use
in your work.: Once you click oneach of the files in the page [resources}
, a window will open which prompts you about saving
the file. Chose "save" , and the files will be downloaded
and saved on your computer. Chose the folder to
save your file and remember the path for later use.
Step 2: Open your Photo shop workspace
On the bottom left corner of your computer screen,
there is a button named "start" . Click on this
button and open the computer menu. Now click on
"all Programs" and find " Adobe Photo shop" in the
list. Double click on Adobe Photo shops' icon and
title. This will open the software workspace for
you
Step 3: Import your photos and downloaded documents
into your workspace
On the top of photo shop workspace , you will
see a menu bar. Click on "file" on this menu bar
and then double click"open" in the drop down list.
This will open a window to your computer where you
can browse your drives and folders and find your
saved files. Find "backgroundbox.psd" , "flowerbox.psd"
and "animalbox.psd" using the path that you previously
recorded. Double click on them and they will open
in photo shop work space.Ask the open house guide
to Unzip your resource file and to import your photograph
for you and adjust the file size.
Start your lessons!
before we start creating your artwork let's spend
some time knowing Photo shop application:
Lesson 1: Photo shop workspace and tools
Photo shop application has a work area , menu
bar and various tools ,palettes and options that
are accessible through the menu bar. In this workshop
we will focus only on a few of these such as the
work area , layer palette and a few of the tools
of toolbox
Lets start by learning about the work area and
tool box.
Photo shop's work area consists of all the gray
area on the screen ( in PC) and includes the menu
bar on the top , the tool box and all the floating
palettes that open in it. Every document or file
that you open is seen in it's own workspace. These
workspaces can be zoomed in and out or float in
the workspace area.

Floating document
windows : Sometimes you need to
see more than one document window in your workspace,
in that case you have to make your documents "float"
in Photo shop workspace. Having floating documents,
enables you to move between windows and cut and
paste elements of one in the other.
To create floating documentspaces, go to the upper
right hand corner of your workspace and click on
the "restore" button. Please note that the "restore"
and " minimize" button of each document is right
behind photo shops general work area "restore and
minimize " button, but in a different color ( see
pictures)
 restore button
 two floating documents
Tool box
The tool box has a selection of different tools
that make different actions possible on the images
, such as : selecting, pasting, filling colors,transforming,
cropping , painting, etc ( see picture below).In
this lesson we will learn the function of a few
tools within tool box. These include : selection
tool, lasso tool, move tool and zoom tool. ( see
picture)

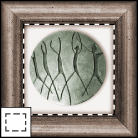
 Marquee or Selection tool : The
marquee tools or selection tools make rectangular,
elliptical, single row, and single column selections.
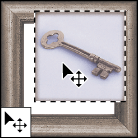
 Move tool :
The move tool lets you drag a selection or layer
to a new location in the image. To move a selection
or layer:Move the pointer inside the selection border,
and drag the selection to a new position. If you
have selected multiple areas, all move as you drag.
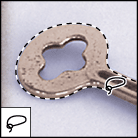
 Lasso tool :
The lasso and polygonal lasso tools let you draw
both straight-edged and freehand segments of a selection
border.
To use the lasso tool:
1. Select the lasso tool , and select options. (See
Setting options for the lasso, polygonal lasso,
and magnetic lasso tools.)
2. Drag to draw a freehand selection border. To
erase recently drawn segments, hold down the Delete
key until you've erased the fastening points for
the desired segment.
# To close the selection border, release the mouse
without holding down Alt (Windows) or Option (Mac
OS).
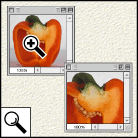
 zoom
tool : # Select the zoom tool zoom
tool . The pointer becomes a magnifying glass with
a plus sign in its center zoom in pointer . Click
the area you want to magnify. Each click magnifies
the image to the next preset percentage, centering
the display around the point you click. When the
image has reached its maximum magnification level
of 1600%, the magnifying glass appears empty.
To zoom out:
Do one of the following:
* Select the zoom tool. Hold down Alt (Windows)
or Option (Mac OS) to activate the zoom-out tool.
The pointer becomes a magnifying glass with a minus
sign in its center Zoom out button . Click the center
of the area of the image you want to reduce. Each
click reduces the view to the previous preset percentage.
When the file has reached its maximum reduction
level, the magnifying glass appears empty.
* Click the Zoom out button Zoom out button in the
options bar to reduce to the previous preset percentage.
When the image has reached its maximum reduction
level, the command is dimmed.
go to page
2

