CSS Essential
Readings
Complete CSS Guide
1. Why Use CSS?
2. What's a Style Sheet?
3. How do They Work?
4. Linking & Embedding
Introduction to CSS
Cascading Style Sheets (CSS) is a stylesheet language used to describe the presentation of a document written in a markup language. Its most common application is to style web pages written in HTML and XHTML, but the language can be applied to any kind of XML document, including SVG and XUL.
CSS can be used locally by the readers of web pages to define colors, fonts, layout, and other aspects of document presentation. It is designed primarily to enable the separation of document content (written in HTML or a similar markup language) from document presentation (written in CSS). This separation can improve content accessibility, provide more flexibility and control in the specification of presentation characteristics, and reduce complexity and repetition in the structural content. (wikipedia)
Embedding CSS
When it comes to application of CSS to web pages, there are generally three choices:
1. Inline Styles: CSS codes directly applying on the TAG (Highest priority, it will overwrite internal stylesheet and external stylesheet)

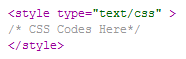
2. Internal Stylesheet: Style code written in the html page (Secondary priority, it will overwrite external stylesheet)
3. External Stylesheet: Linking to an external stylesheet file(can be edited with notepad)or import from a web script document(like javascript or php)

With either internal stylesheet and external stylesheet, the structure of CSS in relationship with HTML syntax is in following structure:
External stylesheet are the most commonly used method to use CSS but it also depends on what you do with your page; for instances, if you only have one page then the internal stylesheet probably works fine; if you want some tag to be different from general definition, you can use inline styles to overwrite the embedded stylesheet
CSS Syntax
The basic syntax for CSS always starts with a tag selector, then it follows a declaration block(start and close with curly brackets), and within the block you can define the values of different properties. You can have multiple properties and each property can have independent values. The property name and value are divided with a colon and multiple properties are divided by a semi colon.
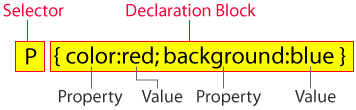
In this chart, we select P tag and define the content(which is text) in all the paragraph will be red and the background will be blue.
Selectors
Tag Selector
The tag selector is the basic building block of CSS syntax and it allows you to define the style of one type of tag; for example, here we stylize the color of the P tag as red, so all the content in P tag will be displayed as red.

Class Selector
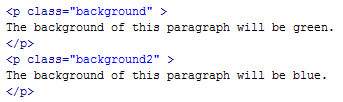
The class selector precedes with a dot, it allows you to create different styles within the same html element. For example, here we want two paragraph tag to have different color(you can use inline style to achieve the same effect, but class selector will allow you to make changes without modifying the original HTML tag); first, we define two class selector for P tag.

Then in our HTML body, we assign classes to different P tag by adding class="name of the class selector you defined in CSS file";
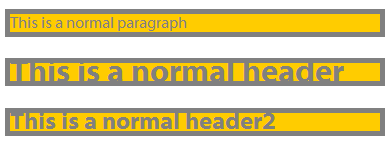
The result will be like this if we preview it in the browser;

ID Selector
The ID selector precedes with a "#" symbol; it is very similar to the class selector, except once an ID has been applied in on tag, it cannot be used anymore within the same HTML document. ID selector is commonly used for the layout elements of a page whereas class selector is used to define specific text.
Here we use ID selector to define the header;

In HTML tag, we assign the ID by adding id="name of the ID selector you defined in CSS";

The final result will be like this in the browser;

Group Selector
Often time as you designing your web pages, you will find that many HTML elements shares the same values; group selector allows you to combine the elements which share the same style into one selector, by doing this, you can avoid frequent copying and pasting; also it makes your CSS code clear and precise in case that you want to revisit some of the elements you can easily find it. The syntax for group selector is show as follow, you can put all the tags together and separate them with commas.
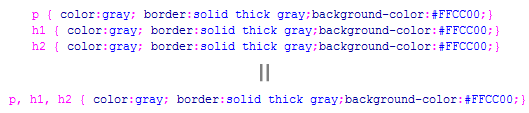
It works exactly the same as having multiple selectors
CSS Typography
When you choose a font for your website, the first thing you need to make sure is that if the font you choose can be viewed on the most computers. Unfortunately, many home computers are not like our designer’s workstation where we have variety of fonts installed, so when you design a web page, the font choice is pretty much limited to the most commonly used font.
It seems that we might not have many choice when it comes to typography on web pages, however, CSS provides us with multiple levels of control on the typography within the same typeface, such as font style, line height, letter spacing.
Let us take a look at what we can do with those properties.
Font
Font property allows you to set all the sub-properties such font-family, weight, variant, size and line height in compound format.

Font Family
Font family allows you to set the typeface of text elements; there are two choice for the values, you can set either the specified font name or generic font family.

Font Size
Font size property allows you to set the size of your text; you can use either px or em(scalable ) for measurement.

Font Style
Font style allows you to set the style of your text (italic, bold or oblique).

Font Variant
Font variant allows you to set the variant of your text(normal/small-caps).

Font Weight
Font weight allows you to set the weight(how bold the text will be displayed) of your text, you can use number from 100 to 900 or lighter/normal/bold/bolder.

Color
Color allows you to set the color of your text; possible values are color name(red/blue/gray) or hexadecimal number(#FF0000) .

Letter Spacing
Letter Spacing allows you to adjust the space between letters; possible values are normal/length(4px, 8px).

Text Alignment
You can align your paragraph with text alignment property; possible values are left/right/center/justify.

Text Decoration
Text decoration allows you to decorate your text; possible values are none/underline/overline/line through/blink.

Text Indent
Text indent allows you to set the indent of the first line of your paragraph; you can either enter the length in pixel or number in percentage.

Text Transform
Text transform allows you to set the size of letters; possible values are none/capitalize/lowercase/uppercase.
![]()
Division and Span
Divisions(Div) and Span are the basic block elements in HTML which define sections in a HTML file. It works as a container for your contents. The only difference between Div and Span is that a linebreak is created with a Div tag whereas Span is a inline element. Basic properties include width:<length in number>/height:<length in number>/Position.
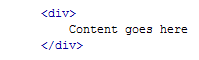
A div tag
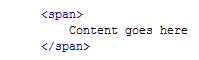
A span tag
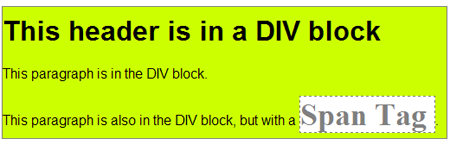
You can apply CSS to Div and Span in general or through ID/Class Selector; here we define the border so you can see precisely how the Div and Span are arranged.
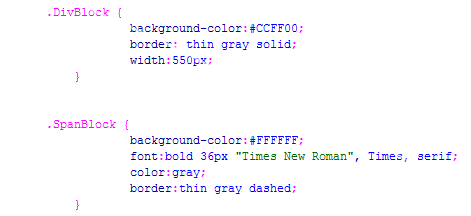
Then in my HTML file
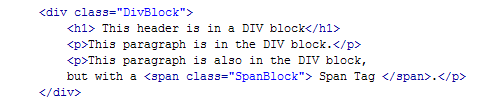
Let us preview in the browser
Page Layout with CSS
The Box Model
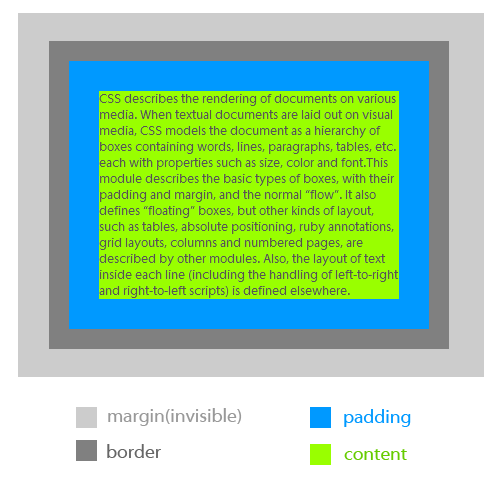
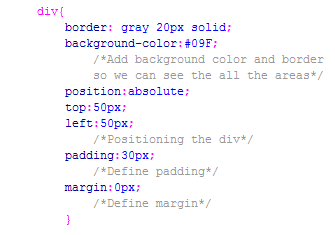
Pretty much every element in HTML generates a box (rectangular contour) no matter if it is visible or not; this is what we call the Box Model. It contains the width, height, margin, padding, border of a HTML element. We can design the page layout by controlling those element boxes through CSS. The follow figure represents that how margin, border, padding and content are related with each other.
Here is the CSS code which styles the div tag
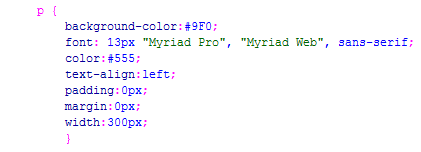
Style the p tag;
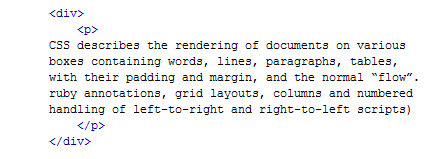
Then here is the HTML;
Positioning
In CSS, we use the position property to arrange elements on webpages.
Possible values are static/relative/absolute/fixed.
Normal Flow: HTML document will be read left to right and top to bottom; That is to say if you lay down an element which is without linebreak, it will stack from left to right such as Span; as well, if you place elements with linebreak such as Div, it will stack from top to down.
Now we understand the concept of Normal Flow, we can start to explain the four positioning types;
Absolute: Regardless the normal flow of your HTML file, positioning an element absolutely, need to specify at least one position properties (top/down/left/right);
Relative: Positioning an element in the normal flow, you can use position properties to adjust the position, however it might cause overlapping elements;
Static: Positioning an element in the normal flow, declaring positions is not needed;
Fixed: Positioning an element with fixed position; it is the same as when you set to absolute except that the fixed element will not scroll with the document.
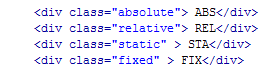
Next, we are going to write four classes with the four different position setting.
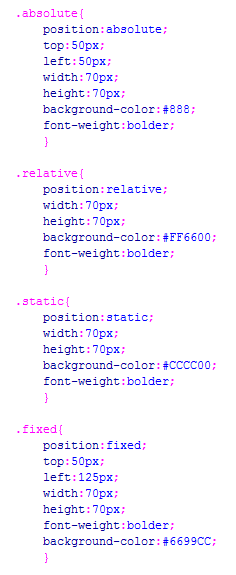
Then apply to four different DIV, preview in the browser and you will see the difference(you should make a really long page so you can test fixed position as scrolling).
Float
Float property allow you to set where an element will appear within its parent element; possible values are left/right/none;
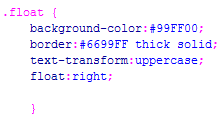
Let us create a class named float( background-color/border properties allow you see the floating block more clear);
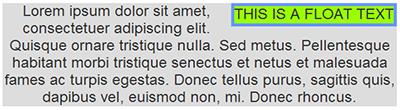
Then apply it to a Div;

Here is it in the browser;
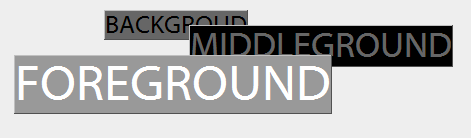
Layering
In CSS, we use z-index to create layers in webpages; this is similar to the concept of layer in Photoshop; it allows you set the stacking order of HTML elements. An element with higher z-index will block the element with lower z-index when overlapping.
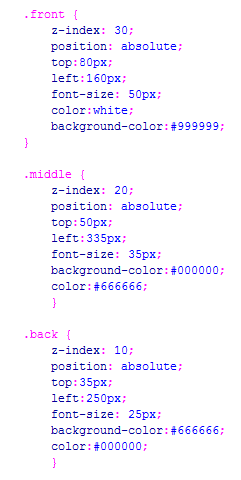
Apply those three classes to three Div and you will see the result.
Interactive Links and Background Images
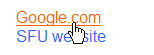
CSS Links (Pseudo Classes)
In CSS there are several special class preset which you can style the several states of a HTML link;

a:link - it sets the color and text decoration when no event is occurring;
a:visited - it sets the color and text decoration when this link has already been visited by users;
a:hover - it sets the color and text decoration when user hover his mouse over the link;
and the result will be like this:
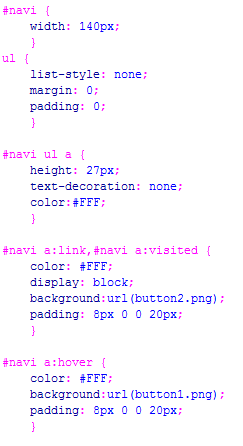
There are more advance properties you can play with to create a very professional interactive link like this:
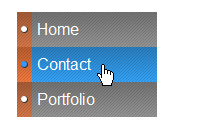
Here is the CSS source code, if you are interested you can look at the code and try to figure out
Then here is the HTML code

Here you can download those two images
![]()
![]()
Background Image
Background-image property allows you to add background image for your HTML elements;inside of url(), you can put the location of the image file
