Overview
This article explains how to use the Mediasite Desktop Recorder to record your lectures.
Mediasite Desktop Recorder allows you to capture and record your computer's desktop, webcam and microphone. Recordings that are in-progress can be paused so that you can deliver your presentation at your own pace. When recordings are finished, they can be published to your MyMediasite account where it can be shared with your audience. Mediasite also features a web-based editor so that you may trim the start and end of your recording or make simple edits.
Note: IT Services has been improving the login security for the Mediasite platform. Please note that this will have an effect on the use of Mediasite Desktop Recorder.
- Mediasite Desktop Recorder sessions must be started from stream.sfu.ca, as per the instructions below.
- Recording durations cannot exceed 2 hours.
DOWNLOADING AND INSTALLING MEDIASITE DESKTOP RECORDER (MDR)
If this is your first time using MDR, you will need to install the desktop software to perform your recordings:
- Log into the MyMediasite portal
- Click Add Presentation
- Click the More Information button under "Capturing video requires an app."
- Click on the download button that corresponds with your operating system. Installers are only available for Windows and Mac operating systems.
Note: For macOS Catalina users, the MDR download in My Mediasite may not work correctly on your system. Instead, please install "Mediasite Capture" from the Mac App Store or by visiting Mediasite Capture - App Store in browser.
RECORDING A PRESENTATION ON YOUR COMPUTER
Once the MDR software is registered with your My Mediasite account, you will be able to start using MyMediasite to begin new recording sessions. It is also possible to begin a new Presentation from MDR, but we recommend starting in MyMediasite.
Step 1: Click Add Media to begin setting up your recording session.
Select the option "I want to record my desktop now" to begin using MDR for a recording session. This will prompt you for more details before attempting to launch the MDR software on your computer.

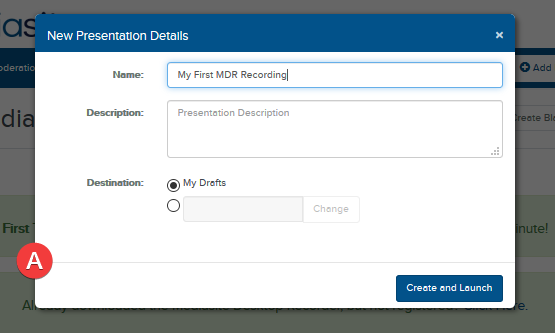
Step 2: Enter your Presentation details and click "Create and Launch"
Mediasite will require you to give the Presentation a title before you can begin. The description is optional but recommended.
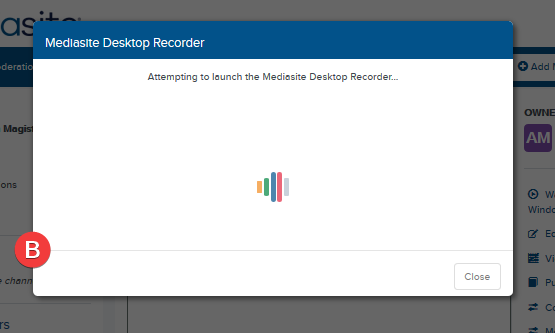
Once you click "Create and Launch", the web browser will download a Mediasite launcher and ask you to open the file in the MDR software. If this is your first time using MDR, please refer to the instructions for "Using MDR for the first time" further up on this page.
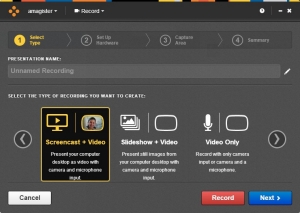
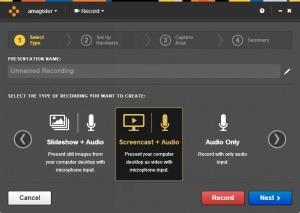
Step 3: Configure your recording preferences
DR will allow you to capture any combination of your webcam, microphone and anything appearing on your desktop. Pick a combination from the available options.
Once you have chosen the type of recording you would like to make, you can either select "Record" or you can click on "Next" to double-check or change options for your microphone and camera. We recommend using the "Next" option and always verifying that the correct devices have been selected.
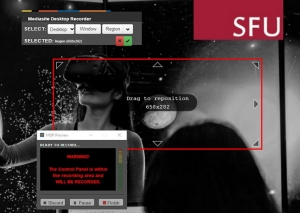
Step 4: Begin recording your Presentation
While you are recording, MDR provides a Preview window. This will show your camera if you are using one, however if it is on-screen for the recording, a message will replace the image to let you know that it might be recorded accidentally.
If you need to take a break or would like to perform in short bursts, MDR allows you to pause and resume your recording. This can be done from the MDR Preview window, or by clicking an icon in the System Tray for your computer.
If you discard your recording, MDR will erase whatever has been recorded and bring you back to Step 3 so that you may try again.

Step 5: Finish your recording
After you have completed your recording, the video will be automatically uploaded to your My Mediasite account. If you would like to choose when your video is uploaded to the system, you can change the default behaviour in the Settings area for the MDR software.
Later, if you decide you would like to re-record your Presentation you can begin a new recording session from the same Presentation in My Mediasite.

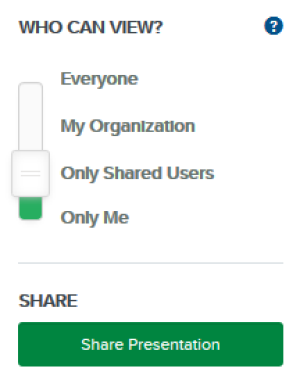
Step 6: When you're ready, make the video viewable for your audiencNo
Note: By default, when a video is uploaded to My Mediasite, the "WHO CAN VIEW?" toggle for the video in My Mediasite will always be reset to "Only Me".
Before your audience can watch the video, you must change the "WHO CAN VIEW?" toggle to another setting. This can only be changed after your video has finished processing.