Model Selection List Window
Use the Model Selection List window
to edit the model selection list,
including adding your own custom models,
and to specify which models in the list are to be used in the automatic
fitting process.
Access it from the Options pull-down menu in the Develop Models,
Automatic Model Fitting Window, Produce Forecasts, and Manage Projects windows.
If you want to reuse any edited model selection list in future
sessions, save the project. When you reload the project file, your customized
model selection list will be available.
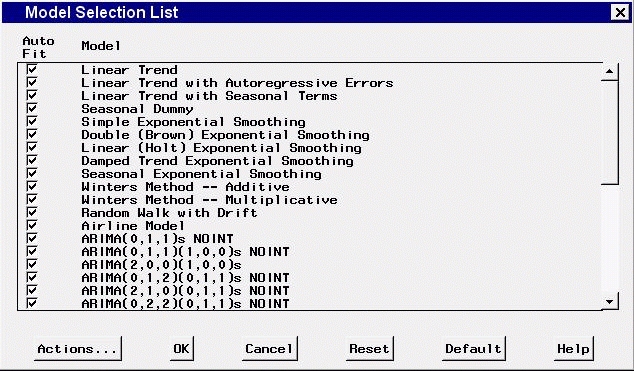
Model Table
This table displays the descriptions of all models in the model selection list.
You can select one or more models by clicking them with the left mouse button.
Selected models are highlighted and become the object of the actions Edit,
Move, and Delete.
The auto fit column of check boxes enables you to eliminate some of the
models from being used in the automatic fitting process without having
to delete them from the list. By default, all models are checked, meaning
that they are all used for automatic fitting.
Controls and Fields
- Actions
-
brings up a pop-up menu of actions that can be applied to the model list.
These actions include:
- Delete
-
deletes any highlighted models from the list. This item is not available if
no models are selected.
- Move
-
enables you to reorder the models in the list. Select one or more models,
then select Move from the pop-up menu. A note appears on the message line:
"Select the row after which the selected models are to be moved."
Then select any unhighlighted row in the table.
The selected models will be moved after this row.
- Edit
-
brings up the appropriate model specification window for changing the attributes
of the highlighted model and adding the modified model to the selection list.
The original model is not deleted. Since this is a generic tool and does
not associate the models with any particular data set, you cannot specify
particular variables as predictors. Items in the model specification
windows that involve designating variables from a data set are therefore
not available when invoked from the Model Selection List window.
- Add
-
enables you to add new models to the selection list. This is the same as the
edit action, except that instead of modifying existing model attributes,
you begin from scratch and are given a choice of using the Smoothing Model
Specification window, the ARIMA Model Specification window, or the Custom Model
Specification window.
- Select All
-
selects all models in the list.
- Unselect All
-
deselects all models in the list.
- Select All--Autofit
-
checks the autofit check boxes of all models in the list.
- Unselect All--Autofit
-
deselects the autofit check boxes of all models in the list.
- OK
-
closes the window and applies any changes made to the project's model selection
list.
- Cancel
-
exits the window and discards any changes made.
- Refresh
-
restores the list to its initial state when the window was invoked.
- Default
-
restores the default model selection list supplied with the software.
Mouse Button Actions
Selecting any model description in the table
with the left mouse button selects (highlights) that model.
Selecting the same model again deselects it.
Multiple selections are allowed.
Selecting the auto fit check box in any row toggles the associated model's
eligibility for use in automatic model fitting.
Selecting the right mouse button brings up a pop-up menu.
This is equivalent to using the Actions button.
Copyright © 1999 by SAS Institute Inc., Cary, NC, USA. All rights reserved.