In this lecture, we learn how to incorporate Google Maps into applications - this is very cool. We have all used Google Maps on laptop browsers and smartphones but only as user up until now.
We will first learn how to create a map activity. Then through a
simple demos app we get a sense of the main programming features
needed to construct and control maps.
The demo code used in this lecture include:
This app will provide the necessary background to implement maps for MyRuns4.
To get the existing demo code to run on your phone, you need to (1) create a Maps API key using Google Console (see Using API Keys); and (2) replace the existing Maps API key in the demo code’s local.properties file with your new Maps API key (see Set up an Android Studio project).
A part of this demo app is an extension of the applications we developed for the lecture on the LocationManger, where we get the current longitude and latitude of your location. So in the code examples below we snip some of the code that we have already discussed in the pervious lecture. You can look at the demo app source code to see the complete source code.
Much of the structure of the code is familiar now.
The code first gets a reference to a GoogleMap using getSupportFragmentManager on a getSupportMapFragment set up in
layout/activity_main.xml, as shown below in the layout file
<fragment xmlns:android="http://schemas.android.com/apk/res/android"
    xmlns:map="http://schemas.android.com/apk/res-auto"
    xmlns:tools="http://schemas.android.com/tools"
    android:id="@+id/map"
    android:name="com.google.android.gms.maps.SupportMapFragment"
    android:layout_width="match_parent"
    android:layout_height="match_parent"
    tools:context=".MapsActivity" />
The getMap() method renders
the Google Map returned from the server
into the SupportMapFragment in layout. The type of map is then set to
normal.
There are a number of types of maps that can be selected:
Change the type of the map in your code and look at the map rendered.
mMap.mapType = GoogleMap.MAP_TYPE_NORMAL
After the map type is set we get the current location and set a marker at that location and zooms in. The location manager sets up the time and distance parameters as well as the call back listener for location updates:
locationManager.requestLocationUpdates(provider, 0, 0f, this)
Upon the launch of the app, we pan the map to the user's current
location, zoom in a bit, and drop a Marker
at the user's location. For the animation part, we use CameraUpdateFactory to specify the
target location using a LatLng object
and zoom level by passing a Float number (e.g., 17f in our case). The
actual animation is done by calling the animateCamera()
function on the Map object with a CameraUpdate
object as an argument. Dropping a Marker on the map is done by
calling addMarker() on the Map
object with a MarkerOptions object
as an argument to specify the target location.
val cameraUpdate = CameraUpdateFactory.newLatLngZoom(latLng, 17f)
mMap.animateCamera(cameraUpdate)
markerOptions.position(latLng)
mMap.addMarker(markerOptions)
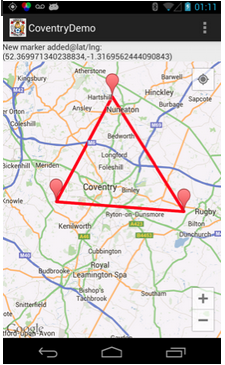
Our app also allows the user to interact with the map by manually placing markers on the map. The system can automatically connect up the markers with polylines drawn on the map (see the image below). A polyline is a list of points, where line segments are drawn between consecutive points. The app detects long clicks on the map and adds a marker. To remove the lines, the user simply clicks on the map (short click).
The callbacks set up to capture the click events are shown below:
PolylineOptions
object contains a list of all the points of the polyline. addPolyline
adds the polyline to the map and returns a reference to the last line
segment. We collect the references using a list called polylines, which
is used in onMapClick() to remove all the lines on the map.override fun onMapClick(latLng: LatLng) {
for (i in polylines.indices)
polylines[i].remove()
polylineOptions.points.clear()
}
override fun onMapLongClick(latLng: LatLng) {
markerOptions.position(latLng!!)
mMap.addMarker(markerOptions)
polylineOptions.add(latLng)
polylines.add(mMap.addPolyline(polylineOptions))
}