Introduction to Flash
This week, you will be introduced to FLASH animation 101. Along with simple animation we will be learning how to create buttons.
Flash Interface
Welcome to Flash. Flash is an incredibly powerful program that has seemingly endless potential. Flash can be used for creating games, making presentations, animations, visualizations, webpage components, and many other interactive applications. Some of the Flash interface components will look familiar to you, as they have the same functionality as other Adobe applications. However, Flash requires a certain mindset to work in it properly, especially when animating with vector graphics and coding with actionscript 3.0.
Here is an overview of the Flash interface.
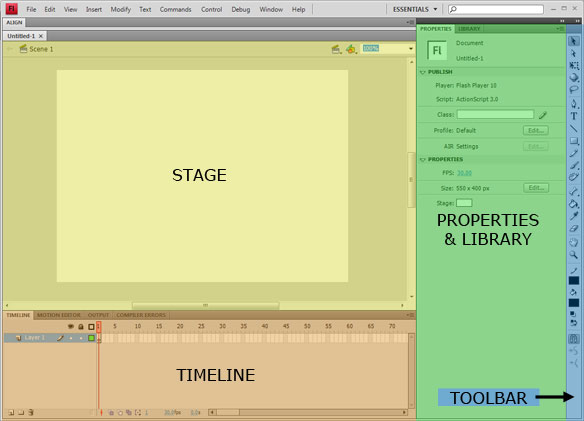
Stage: The stage is the main workspace of Flash, all your compositional elements (movie clips, buttons, graphics, and etc.) will be arranged here.. Content that is within the box in the middle of the stage will be visible when the Flash movie is output. The grey background area outside the box in the middle is 'off-stage'. You can animate content from off-stage onto the main stage area or use a background image that is larger than the main stage to move around as if the camera is panning across a background. The Stage has several context which are indicated along the top bar of the stage. It can present content that is in a Scene or can present sub-content such as objects from the library. You can show and hide the things that exceed the size of your stage by turning off/on Pasteboard (View>>Pasteboard)
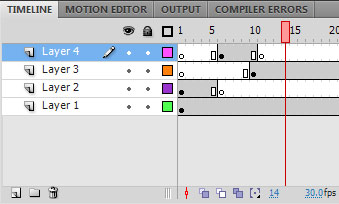
Timeline: The numbers across the bottom correspond to the frames that occur as time progresses through the movie. You can navigate to any frame of your animation to perform editing. Also, Flash has layers just like many other Adobe applications. These appear along the left side of the Timeline.
Properties: The Properties tab changes depending on which tool on the toolbar you have selected or which object you have selected on the stage. Each object or tool has its own properties which can be adjusted in this tab.
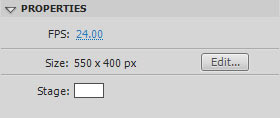
When you have the Selection Tool selected and click the background of the stage, the Properties tab shows the Document Properties. Here you can set the size of your Flash file, background color, frame rate and exporting settings.
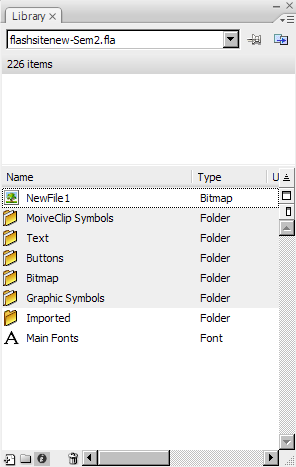
Library: The library tab will be your best friend in Flash. It holds all the symbol objects of each Flash file. You can organize your library like you did in your windows/mac directory. (i.e. created new folders for different types of elements, or nest one symbol in another)
Drawings & Symbols
There are two primary types in Flash, Drawings and Symbols. Drawings are created with the vector editing tools in Flash such as the Pencil, Brush, Oval, Rectangle, etc. Drawings have stroke and fill which can be reshaped via the Selection and Subselection tools as well as any other vector editing tools.
Symbols are a powerful feature of Flash in that you can draw an object once, save it in your library, and use it over and over. Symbols can be created from a Drawing, collections of Drawings and other Symbols, or external files (JPGs, PNGs for instance). Basically, symbols are like container for your visual/auditory elements. Instead of having hundreds of graphics, text, and other elements laying on the stage, you can create a symbol and use wherever you need it. If you want to change the appearance of every instance of that object throughout your movie you can directly edit the Symbol in the library. You can also break apart Symbols into their original objects to make derivatives of a Symbol.
Symbols: Movie Clips vs Graphic vs Button
There are three types of Symbols: a Movie Clip, a Graphic symbol, or a Button symbol.
These symbols can have actions applied to them to dynamically load, disappear, trigger other events, and many other things (in actionscript).
The fundamental distinction between Movie Clips and Graphic are that the former has it own independent timeline whereas the latter shares the same timeline with the stage’s timeline. Button symbols are simplified objects with special frames for a mouseover appearance, and a click appearance.
Library Structure
Once you start to work on a flash project, most likely you will have a lots different types of files(text, graphics, video, imported stock images), you want to have your library organized in a way that files of the same type should be placed together and give your folder recognizable names so when you need to find some elements you know where to look for it. It will save your time and hassle, also it will make your work flow better. This is very critical if you are working in a team, because when you pass the file you have worked on to other people; if the library is not well-structuralized; your co-workers will have hard time to simply start it.
Flash Project Properties
When you first create a new Flash project you are presented with the default properties page on the right side of the screen. These properties all have a significant impact on the movie and should only be adjusted at the beginning of a project or a significant amount of work may be required to correct the issues that arise.
FPS stands for Frames Per Second and is the frame rate of your movie which determines the smoothness of your animation. For fluid motion the frame rate should be left at 24-30 fps. If your animation doesn't have much movement or doesn't require this level of quality, reducing the frame rate can significantly the file size of your resulting movie. Note that while changing the frame rate does have an overall impact on the speed at which your frames play, you should never use the frame rate as a means to adjust the speed of your movie.
This property page also allows the adjustment of the size and color of the stage. The stage determines the output size of the movie, while the size can be adjusted in the player, you achieve your best quality setting your stage to the maximum size you expect for your final output.
Timeline & Frames
In Flash we place all content in layers just like in Photoshop. The same tools exist to create a new layer, delete a layer, and create folders for layers. The primary difference is that content must be placed into a Keyframe on the timeline. Keyframes are frames in the timeline that contain information (content or script). Keyframes without content are denoted by an empty circle, keyframes with content have a filled circle. You can right-click on the timeline for a specific layer and select 'Insert Blank Keyframe' to begin adding content (when you create a new layer there is always a blank keyframe at frame 1). Click a blank or empty keyframe in the timeline to add content to that frame. A keyframe only lasts for one frame (if your movie is 30 frames per second a single keyframe is 1/30 of a second). To extend the length of a keyframe, right-click onto a frame further down the timeline and select 'Insert Frame'. You can also select, drag, copy and paste frames. Note that in order to perform any operation on a frame you must select it first.