Chapter Contents
Previous
Next
|
Chapter Contents |
Previous |
Next |
| The GAGE Application |
All calculations described here
are based upon a specified multiple of ![]() , where the multiple
, where the multiple ![]() can be 4, 5.15, or 6.
Figure A.3 shows a sample gage report created with the GAGE
application using the average and range
method.
can be 4, 5.15, or 6.
Figure A.3 shows a sample gage report created with the GAGE
application using the average and range
method.
The measure of repeatability (or equipment variation), denoted by EV, is calculated as


                   Average and Range Method

    Test ID: Gasket         Performed By:
    Date:    09/18/98       John Smith

    Part No. & Name:   Gasket
    Characteristics:
    Specification:     0.6-1.0 mm

    Gage Name: Thickness
    Gage No.:  X-2034
    Gage Type: 0-10 mm


      MEASUREMENT UNIT ANALYSIS       % PROCESS VARIATION
    Repeatability
        EV  =      0.1443               % EV   =  15.33 %
    Reproducibility
        AV  =      0.1516               % AV   =  16.11 %
    Gage R&R
        R&R =      0.2093               % R&R  =  22.24 %
    Part Variation
        PV  =      0.9177               % PV   =  97.50 %
    Total Variation
        TV  =      0.9413


         Results are based upon predicting 5.15 sigma.
    (99.0% of the area under the normal distribution curve)
|
The quantity d2 (Duncan 1974, Table M) depends on the number of
trials used to calculate a single range. In the GAGE
application, the number of trials can vary from 2 to 4.
Use of d2 is valid when ![]() ; otherwise, the GAGE application uses d2* (Duncan 1974, Table D3),
which is based on the number
of ranges calculated from #operators ×#parts and
on the number of trials.
; otherwise, the GAGE application uses d2* (Duncan 1974, Table D3),
which is based on the number
of ranges calculated from #operators ×#parts and
on the number of trials.
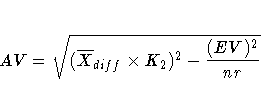
The measure of reproducibility (or appraiser variation), denoted by AV, is calculated as


The measure of repeatability and reproducibility, denoted by R&R, is calculated as

Part-to-part variation, denoted by PV, is calculated as

Here the quantity d2* (Duncan 1974, Table D3) depends on the number of parts used to calculate a single range. In the GAGE application, the number of parts can vary from 2 to 15.
Total variation, denoted by TV, is based on gage R&R and part-to-part variation.

The measures of repeatability, reproducibility, gage R&R, part variation, and total variation are shown in Figure A.3 under the heading "MEASUREMENT UNIT ANALYSIS." The right-hand side of the report shows the "% PROCESS VARIATION" analysis, which compares the gage factors to total variation. The percent of total variation accounted for by each factor is calculated as follows:
![\%EV & = & 100 [\frac{EV}{TV}] \ \%AV & = & 100 [\frac{AV}{TV}] \ \%R\&R & = & 100 [\frac{R\&R}{TV}] \ \%PV & = & 100 [\frac{PV}{TV}]](images/ap1eq21.gif)
Instead of percent of process variation, your analysis may be based on percent of tolerance. For this you must specify a tolerance value. Then %EV, %AV, %R&R, and %PV are calculated by substituting the tolerance value for TV (the denominator) in the preceding formulas. A sample report with "% TOLERANCE ANALYSIS" is shown in Figure A.4.
What is considered acceptable for %R&R?
Barrentine (1991) gives the following guidelines:
| 10% or less | excellent |
| 11% to 20% | adequate |
| 21% to 30% | marginally acceptable |
| over 30% | unacceptable |
In general, interpretation may be guided by local standards.
                   Average and Range Method

    Test ID: Gasket         Performed By:
    Date:    09/18/98       John Smith

    Part No. & Name:   Gasket
    Characteristics:
    Specification:     0.6-1.0 mm

    Gage Name: Thickness
    Gage No.:  X-2034
    Gage Type: 0-10 mm                  Tolerance: 0.4


      MEASUREMENT UNIT ANALYSIS       % TOLERANCE ANALYSIS
    Repeatability
        EV  =      0.1443               % EV   =  36.08 %
    Reproducibility
        AV  =      0.1516               % AV   =  37.91 %
    Gage R&R
        R&R =      0.2093               % R&R  =  52.34 %
    Part Variation
        PV  =      0.9177               % PV   = 229.43 %
    Total Variation
        TV  =      0.9413


         Results are based upon predicting 5.15 sigma.
    (99.0% of the area under the normal distribution curve)
|
|
Chapter Contents |
Previous |
Next |
Top |
Copyright © 1999 by SAS Institute Inc., Cary, NC, USA. All rights reserved.