
- About Us
- People
- Undergrad
- Graduate
- Research
- News & Events
- Outreach
- Equity
- _how-to
- Congratulations to our Class of 2021
- Archive
- AKCSE
- Atlas Tier 1 Data Centre


The Ruler Shoot
Ruler shooting ~30 Minutes
NOTE: It takes some skill to fire the ruler consistently. Save for enthusiastic class.
Description: A ruler is shot off a stool at different speeds using an elastic band.
Objective: To learn about types of forces and how they affect motion, to learn about experimental error, and to graph results.
Outcomes:
-demonstrate how force can be applied to move an object (grade 1)
-demonstrate how various forces can affect the movement of objects (grade 5)
Materials: A low flat stool or desk, a 30cm ruler, thick elastic band ~8cm long, piece of masking or electrical tape
Doing it:
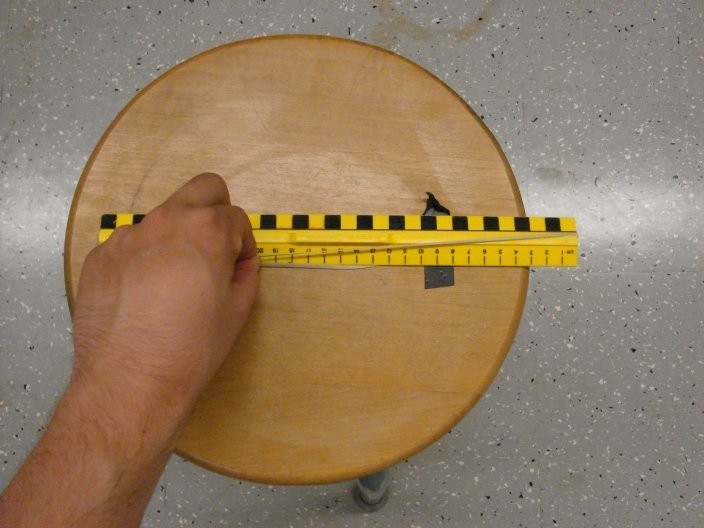
A1. Position the desk or stool so that the edge is above some mark on the floor you will be able to measure from, tile floors are ideal. Place a piece of tape in the middle of the stool or about 20cm from the edge of the desk or stool. You will use this as a mark to gauge each launch. Loop the elastic around the end of the ruler. Position the ruler so the elastic is taunt but not stretched, and the '0' on the ruler is lined up with the mark.
A2. To fire the ruler, pull it back until the scale reads the desired number and let go. It may require some practice to get a clean, straight launch. You want as little rotation as possible. Now try several different drawing distances. The drawing distances you use will depend on the strength of the elastic, but we used 2,3,4,6, and 8cm.
A3. Have one student watching closely where it lands and one recording the distance the ruler travels. The distance can be recorded in units of 'tiles' or, if you must work on carpet, in cm. You should record data for about 5 launches at each drawing distance.
A4. Plot each data point and the average for each point on a graph. The data should fit a straight line.
Explanation: The energy with which the ruler is shot depends directly on how far back it is pulled. It so happens that it is a linear relationship, i.e. pulling twice as far back will shoot it twice as fast and roughly twice as far.
Experiment Feedback
Ruler Shoot Feedback
This activity was tried out on a group of 15 grade 5 students in June 2007. We divided them into groups of 4. Roles were divided into a "ruler shooter", two measurers, and a note taker. I found that many of the students had great difficulty with the hand eye coordination required to launch the ruler. Also, there was a huge variation in the overall skill level of the students. I would therefore recommend this activity as an enrichment activity for smaller groups. A simpler way of launching the ruler might make it more accessible to a wider group of kids. My experience with this class was that the majority understood how to do averages. It was also very useful to teach them about multiple samples and experimental error. Most of them managed to produce a graph, however, few of them had time to take averages of the different samples, and as a result there was a tremendous variation in the quality of the graphs. In summary, not appropriate for a whole class, but useful for small groups of focused kids.
Updated in May 2007
Created by Brock Watson May 25 2007