7B10.10 Video Spectrometer (Emission Spectra)
Concepts
Atomic spectra, diffraction
Overview
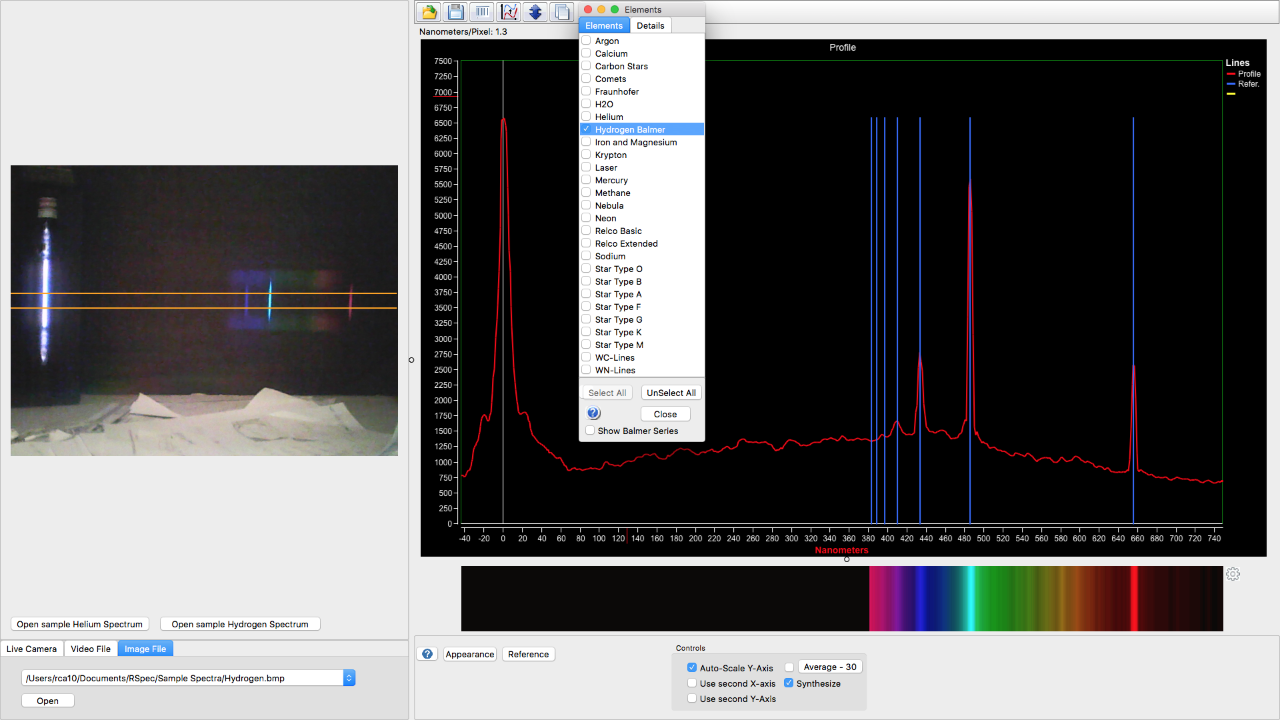
A webcam with a diffraction grating on it captures an optical image and spectrum of an elemental light source. Associated software allows an entire class to view the spectrum live and to follow how to analyze the spectrum to identify the element.

Details
Equipment
- [1] Spectral lamp with source (hydrogen, helium, neon, mercury, and others available)
- [1] Spectrometer camera with tripod
- [1] Pair of black panels with stand
- [1] Small box or platform
- [1] Computer with RSpec software (Windows or Mac OS)
- [1] Extension cord (if necessary)
Classroom Assembly
- Place and plug in the spectral lamp.
- Plug the camera into the computer and run the RSpec software.
- In the RSpec software, adjust the spectrum measurement area to be somewhere in the middle of the live view.
- Turn on the lamp.
- Mount the camera on the box and adjust the camera view until the lamp's bright region aligns with the 0 nm mark on the intensity graph.
- Place the black panels so that everything in the camera's view to the right of the lamp is blocked by the panels.
- Turn off the lamp.
Important Notes
- The spectrometer works best in darkness, though the black panels help if turning off most of the lights is impractical.
- The black panels should block everything on the camera's right-side field of view.
- If using the hydrogen source, be sure to aim the camera at the red part of the excited gas.
- Turn off the lamp when not in use to preserve its useful life.
- Practice with the RSpec software required.
Script
- Turn off or dim as many lights as possible.
- Turn on the lamp. Observe how the camera software now picks up intensity peaks at various wavelengths.
- Click on the vertical lines icon to bring up the elements window. Check off an element to show the reference wavelengths on the graph.
- [Mac OS and hydrogen only] Click on "Show Balmer Series" to show a graphical representation of the Balmer series transitions. Click on a specific transition to display its reference wavelength on the graph. Close the Balmer series window.
- Turn off the lamp.
Additional Resources
References
- PIRA 7B10.10, 6D20.XX, 5N30.XX
- RSpec training videos for the Mac OS version of the software
- RSpec training videos for Windows available from the help menu, under "video library," of the Windows RSpec Explorer software
Disclaimer
- Don't attempt this at home!
Last revised
- 2025
Technicals
- On Windows, the RSpec software license key appears to be associated with the users who input the key. NexGEN periodically wipes unused user profiles, so this also wipes the license key.
- On the day before, check the computer has all Windows updates installed.
Related AV
Related demos
If you have any questions about the demos or notes you would like to add to this page, contact Ricky Chu at ricky_chu AT sfu DOT ca.