Chapter Contents
Previous
Next
|
Chapter Contents |
Previous |
Next |
| Getting Started with Time Series Forecasting |
In the first forecasting example, you used the Automatic Model Fitting window to fit and select the forecasting model for each series automatically. In addition to this automatic forecasting process, you can also work with time series one at a time to fit forecasting models and apply your own judgement to choose the best forecasting model for each series.
Using the Automatic Model Fitting feature, the system acts like a "black box." This section goes inside the black box to look at the kinds of forecasting methods that the system provides and introduces some of the tools the system offers to help you find the best forecasting model.
Select OK to close the selection window. Now select the Develop Models button. This brings up the Series Selection window, as shown in Display 23.29. You can enlarge this window for easier viewing of lists of data sets and series.
Display 23.29: Series Selection Window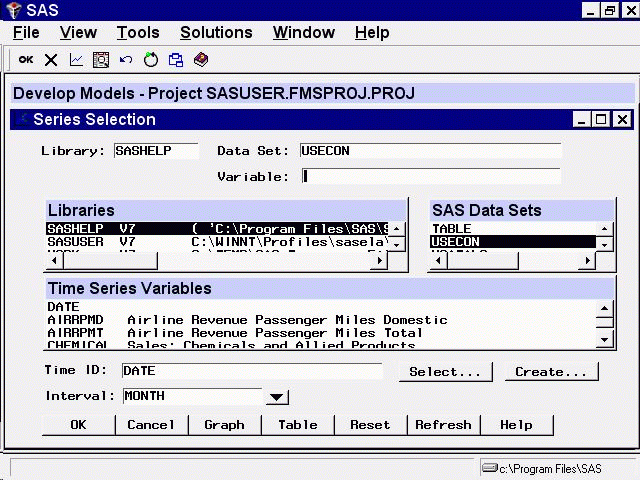
Select the series CHEMICAL, Sales of Chemicals and Allied Products, and then select the OK button.
This brings up the Develop Models window, as shown in Display 23.30.
Display 23.30: Develop Models Window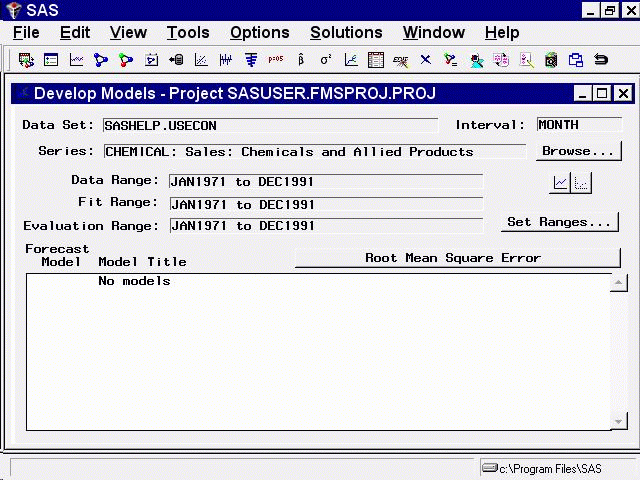
The Data Set, Interval, and Series fields in the upper part of the Develop Models window indicate the series with which you are currently working. You can change the settings of these fields by selecting the Browse button.
The Data Range, Fit Range, and Evaluation Range fields show the time period over which data are available for the current series, and what parts of that time period will be used to fit forecasting models to the series and to evaluate how well the models fit the data. You can change the settings of these fields by selecting the Set Ranges button.
The bottom part of the Develop Models window consists of a table of forecasting models fit to the series. Initially, the list is empty, as indicated by the message "No models." You can fit any number of forecasting models to each series and designate which one you want to use to produce forecasts.
Graphical tools are available for exploring time series and fitted models. The two icons below the Browse button access the Time Series Viewer and the Model Viewer.
Select the left icon. This brings up the Time Series Viewer window, as shown in Display 23.31.
Display 23.31: Chemical and Allied Product Series
The Time Series Viewer displays a plot of the CHEMICAL series. The Time Series Viewer offers many useful features, which are explored in later sections.
The Time Series Viewer appears in a separate resizable window. You can switch back and forth between the Time Series Viewer window and other windows. For now, return to the Develop Models window. You can close the Time Series Viewer window or leave it open. (To close the Time Series Viewer window, select Close from the toolbar or from the File pull-down menu.)
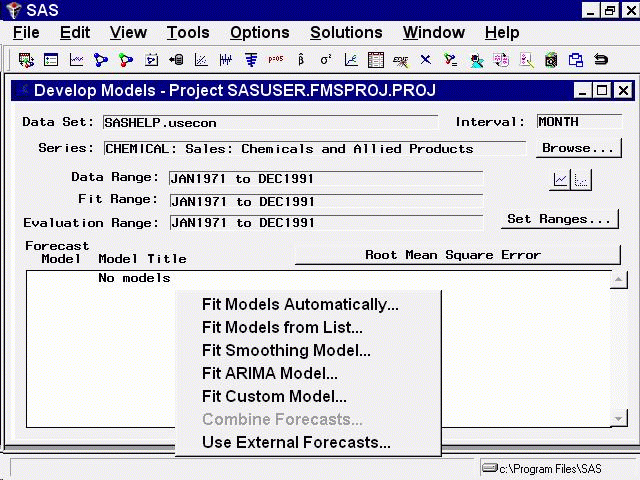
The Forecasting System provides several ways to specify forecasting models. The seven choices given by the menu shown in Display 23.32 are as follows:
All the forecasting models used by the system are ultimately specified through one of the three windows: Smoothing Method Specification, ARIMA Model Specification, or Custom Model Specification. You can specify the same models with either the ARIMA Model Specification window or the Custom Model Specification window, but the Custom Model Specification window may provide a more natural way to specify models for those who are less familiar with the Box-Jenkins style of time series model specification.
The Automatic Model feature, the Models to Fit window, and the Forecast Combination Model Specification window all deal with lists of forecasting models previously defined through the Smoothing Model, ARIMA Model, or Custom Model specification windows. These windows are discussed in detail in later sections.
To get started using the Develop Models window, select the Fit Models from List item from the menu shown in Display 23.32. This brings up the Models to Fit window, as shown in Display 23.33.
Display 23.33: Models to Fit Window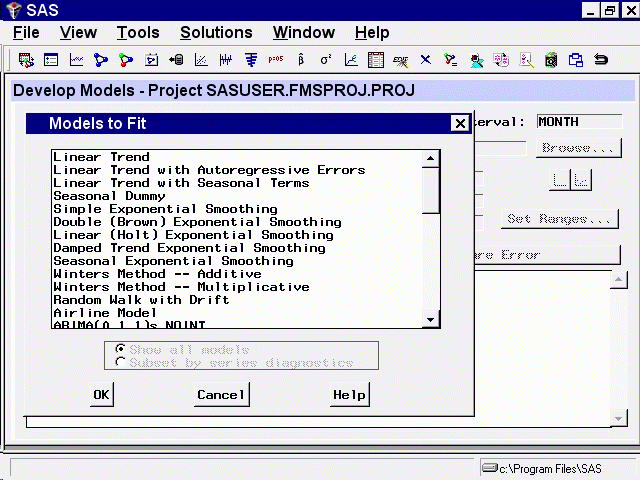
You can select several models to fit at once by holding down the CTRL key as you make the selections. Select Linear Trend and Double (Brown) Exponential Smoothing, as shown in Display 23.34, and then select the OK button.
Display 23.34: Selecting Models to Fit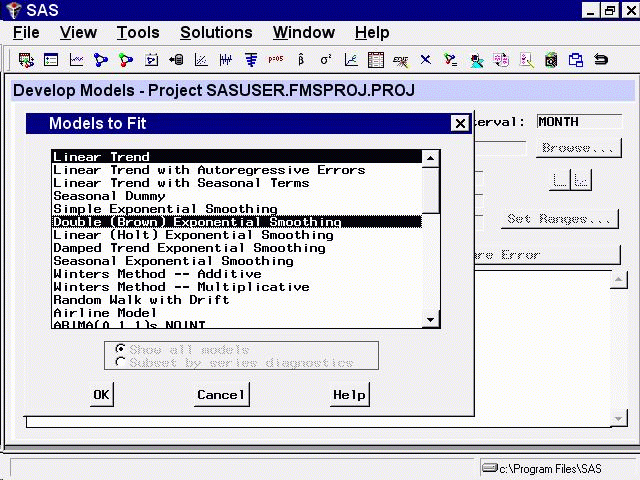
The system fits the two models you selected. After the models are fit, the labels of the two models and their goodness-of-fit statistic are added to the model table, as shown in Display 23.35.
Display 23.35: Fitted Models List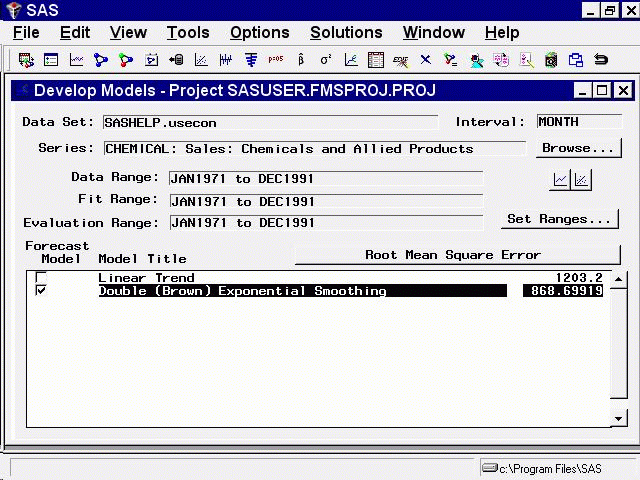
The column labeled Root Mean Square Error (or labeled Mean Absolute Percent Error if you continued from the example in the previous section) shows the goodness-of-fit criterion used to decide which model fits better. By default, the criterion used is the root mean square error, but you can choose a different measure of fit. The linear trend model has a root mean square error of 1203, while the double exponential smoothing model fits better, with a RMSE of only 869.
The left column labeled Forecast Model consists of check boxes that indicate which one of the models in the list has been selected as the model to use to produce the forecasts for the series. When new models are fit and added to the model list, the system sets the Forecast Model flags to designate the one model with the best fit--as measured by the selected goodness-of-fit statistic--as the forecast model. (In the case of ties, the first model with the best fit is selected.)
Because the Double Exponential Smoothing model has the smaller RMSE of the two models in the list, its Forecast Model check box is set. If you would rather produce forecasts using the Linear Trend model, choose it by selecting the corresponding check box in the Forecast Model column.
To use a different goodness-of-fit criterion, select the button with the current criterion name on it (Root Mean Square Error or Mean Absolute Percent Error). This brings up the Model Selection Criterion window, as shown in Display 23.36.
Display 23.36: Model Selection Criterion Window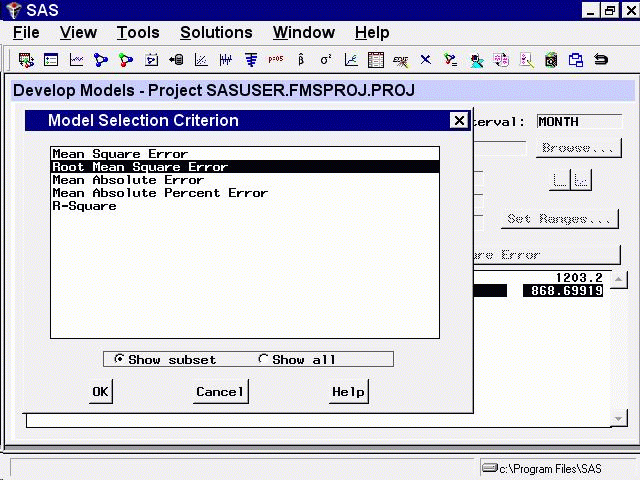
The system provides many measures of fit that you can use as the model selection criterion. To avoid confusion, only the most popular of the available fit statistics are shown in this window by default. To display the complete list, you can select the Show all option. You can control the subset of statistics listed in this window through the Statistics of Fit item in the Options menu on the Develop Models window.
Initially, Root Mean Square Error is selected. Select R-Square and then select the OK button. This changes the fit statistic displayed in the model list, as shown in Display 23.37.
Display 23.37: Model List with R-Square Statistics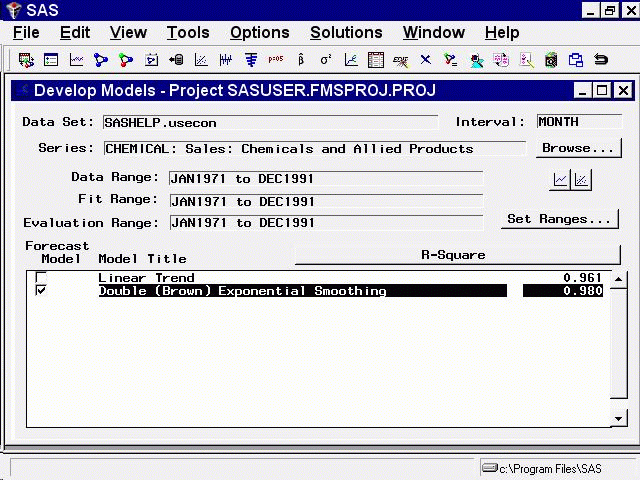
Now that you have fit some models to the series, you can use the Model Viewer button to take a closer look at the predictions of these models.
|
Chapter Contents |
Previous |
Next |
Top |
Copyright © 1999 by SAS Institute Inc., Cary, NC, USA. All rights reserved.