Photo Retouching
Clone & Healing Tools
Photoshop tool offer amazing ways to manipulate a photo. When you look in a photo you can see minor mistakes or flaws in the image such as red eyes. Photoshop offers a wide rang of tools you can use to adjust or correct those flaws, from removing wrinkles to erasing entire objects from an image. You can also apply effects that give your image texture or pattern and change the color.
All cloning tools use a sample area of an image to brush over the target area.
Clone Stamp Tool
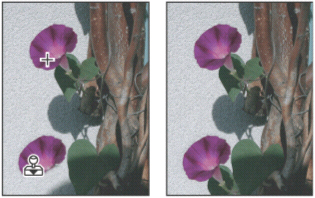
You can use the clone stamp tool quickly and easily to remove unwanted elements such as water marks, dust, and even people
- Click the clone stamp tool

- Click a source area while pressing and holding the Alt key
- Apply the brush to the area you want to correct(the source point moves in alignment with the brush)
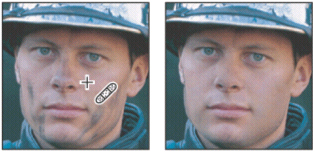
Healing Brush Tool
The key difference with the healing Brush tool is that it matches the texture, lighting and shading of the sample pixels to the target pixels, this creates a smoother and more seamless repair of unwanted pixels
- Click the healing brush tool

- Click a source area while pressing and holding the Alt key
- Apply the brush to the area you want to correct(the source point moves in alignment with the brush)
Retouching your images with Clone/Healing
1. These are the two images that are in the retouch.psd file that you downloaded from this week's source files(iat100_week4_files.rar) 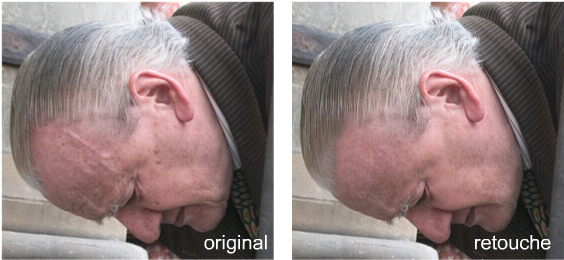
2. In this tutorial we will use a few tools in Photoshop to make this old man, look younger. The top layer is the retouched image and the bottom is the original one. You can look at the bottom image by turning the visibility of the top layer off. You can do this by clicking the little eye icon in the layer.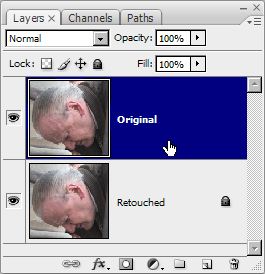
3. All the work we will do in this tutorial involves the Cloning Tool, the Healing Tool and layers. So what you want to try to do is duplicate the "Original" layer, and try to achieve the same effects that exist in the "Retouched" layers. So first turn off the visibility of the "Retouched" layer by clicking the eye icon on the left side of the layer. Then right click on the "Original" layer and choose Duplicate Layer. After this it will ask you to name to layer, so name it, then click ok. Now you can work in this layer and try to retouch it.
4. The concept behind retouching images using the healing and clone tools is actually very straight forward. The way the cloning tool works is, you hold the ALT Key (or OPTION on MAC) and click on whatever you want to clone in order to define the source point. This point where you click is what the clone tool will clone as you paint with it. The source point will move along with your brush as you paint and literally clone whatever the source point is going over.
5. The Healing Tool works very much the same way. In order to set the source point you hold the ALT Key (or OPTION on MAC) and click on whatever are you want to sample. Like the Cloning Tool, you use the Healing Brush tool to paint with sampled pixels from an image or pattern. However, the Healing Brush tool also matches the texture, lighting, transparency, and shading of the sampled pixels to the source pixels. As a result, the repaired pixels blend seamlessly into the rest of the image.

6. Now all you have to do is select areas of skin that are healthy, unblemished and clean looking as source points for these tools and then paint them over the old or blemished looking skin. The important thing to remember is to constantly keep choosing slightly random new source points to avoid creating patterns.