Create a HTML Page
create a folder on your desktop, extract source files into folder
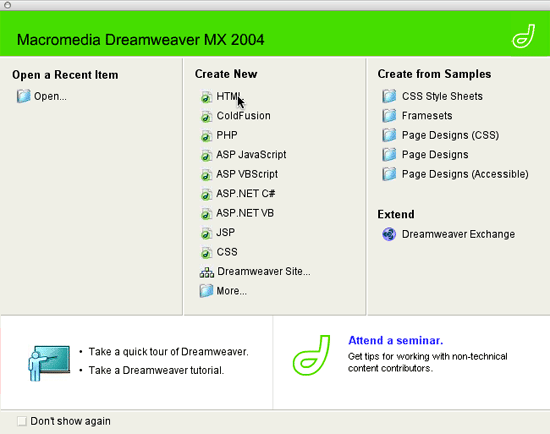
1. click here to preview the website we are going to make
2. Open up Dreamweaver and you'll see an option for you to choose what kind of new document you want to create.
Choose a new HTML document to get started.
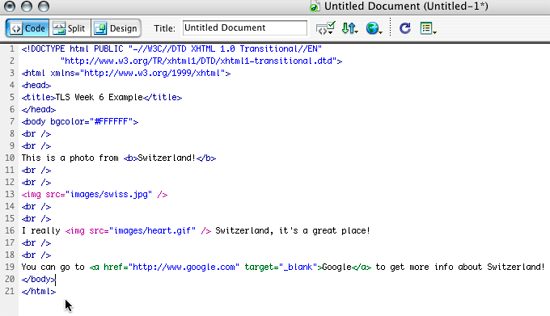
3. The first thing you will always see in a XHTML document is the DOC TYPE. This is generated by the web text editor for you. When a page is accessed, the browser will read this tag so that it knows what kind of document it is reading and how it should display it. Here we're using Transitional XHTML 1.0.*what is trasitional vs strict link
![]()
4. The structure of an HTML page is done with tags. HTML tags consists if one or a few letters, surrounded by triangular brackets (< >)Tags define looks, styles or behaviors; anything in between tags will have that look, style or behavior. An example of this is the <b>bold</b>tag. All tags have to be CLOSED; anytime you see a tag like <html> you will always see it closed at the end of its length (e.g. the <html> tag begins at the top of the page and ends at the bottom, it contains all the code for that page). A closed tag will generally look like </html> or </p> and </ol>
Some tags don't require a close tag simply because they don't apply to anything other than themselves. This, for instance, means that they may have internally defined characteristics or create space. The two most common tags that act this way are the <img /> (image) and <br /> (breakline) tags.
![]()
5. The next tag in line is the <head> of your document, which contains information detailing the <title>of the document(this shows up on your browser bar) or specific <script> information. A common script, used for web development is JAVASCRIPT, and another common tag is the METADATA tag, which are read by search engines.
6. Here's the code we'll be putting into our <title> tag (NOTE: we're not putting any metadata because we don't need this site to be searched by any engines.

7. Next comes the <body> of the page. All the code that produces visible effects on your site is written within this tag.
Within the body tag we want to declare the background color we would like for the page.
The inline style we're using here defines the page background as white. It is a WEB COLOR... you can find a list of hex colors HERE
![]()
You can declare a variety of characteristics within opening tag, these are called INLINE STYLES and will affect the overall display of your site.
8. We've completed our setup, now on to the web page development. Below the body tag add <h1>; is a level one heading tag, heading tags range from h1 to h6; being the smallest heading characteristics. Try a variety of heading tags, to see the difference.
<h1>My Vacation</h1>
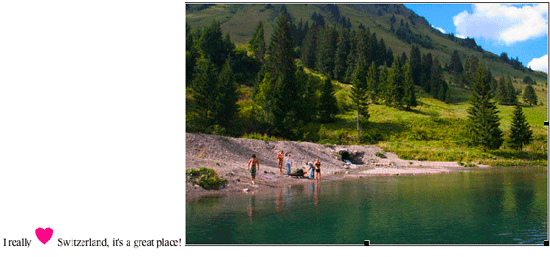
9. Next, type in some text, this is a photo from switzerland. Around the word Switzerland we type <b></b> to make the word display bold. We follow up with two more breakline tags (because we want to create some space between the text and the image to come).

10. Now that we have our text written the next step is to add an image. Go to the menu bar, insert > image

find the image: swiss.jpg

11. to continue: i really * insert image* Switzerland, it's a great place!

12. Here we insert a link into the middle of a sentence. The title of the text we want to become a link must lie inside an <a> and an </a> tags; these tags are called ANCHOR tags. We start by writing <a href=“” and we'll insert the hypertext link between the quotations (just like embedding and image); so put http://www.google.com in there. The next thing we'll do is give our link a specific window by writing target=“_blank”. We'll close of the the opening tag with a > and insert the text GOOGLE followed by a closing tag that looks like </a>.
This is the end of our page, so we'll finish up by writing a <body> followed by a </html> which close off the end of the document.
13. you can go to google*link* to get more information about Switzerland

14. This is what your code should look like.
15. With your code all in order, save your document in the same place as the images folder that you downloaded with this weeks tutorial source file.

16. If you select the split screen mode, you'll be able to see your code and a bit of what the page will look like when you're finished.

17. If you select the design screen mode, you will be able to drag and drop components of your site into place. You'll also be able to type directly on the page to add content. It's this component of Dreamweaver that makes it a WYSIWYG editor.

18. For example, you can drag this image to the end of the next line of text with your mouse.
19. Notice that, if you switch back to the code screen mode, the code for the image will have moved down a couple of lines.

20. If you look at the properties panel at the bottom of the screen you'll see that the path to the image is there (if you've clicked on the image and selected it).

21. Another useful feature of Dreamweaver's WYSIWYG functionality is the hot spot tool which generates IMAGE MAPS for you.

22. With the hot spot tool selected, you can click around a part of your image to make that area an image map (image maps can be made into links).

23. If you want to adjust the shape of your image map, use the hot spot pointer tool to select the maps points and drag them into the right configuration.


24. You can input the image map details in the hot spot properties panel.

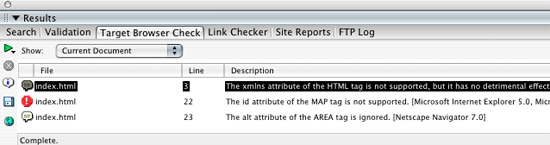
25. Finally, another important feature is the check browser support function. At the top of your screen you can click the button and Dreamweaver will run a check for you.

26. An output panel appears listing the errors and the browsers for which your site isn't compatible. Here our only problem is with Netscape Navigator, but we won't worry about it because Netscape is rarely used compared to other browsers (HERE'S WHY).
Don't worry about the other two warnings, image maps work fine in IE and the other is just about Netscape.
Finally the last step! save as index.html and upload to FTP, in pub_html folder