Action Script 3.0
Introduction
Aside from making animation, Flash is also well-known for creating interactive applications. Action Script 3.0 in Flash allows you to create all kinds of fully interactive applications such as dynamic websites and computer games. Also, AS3.0 is an object-oriented programming language; if you are familiar with AS3.0, it will help you to learn other object-oriented language such as Javascript.
In this sort lesson, our goal is to provide you with some basic understanding of some crucial concepts and the syntax; so once you can find ready-made AS3.0 online and modify it to suit your own purpose.
Unfortunately, if you had previous experience in AS2.0, the chances are that it will not help you learning AS3.0 as much and it might even slow you down. The reason is that in AS3.0, all the coding methods are standardized, therefore it becomes less visualized. It would be easier for programmer, but it become harder for designer since you do not immediately see you have done with your code.
Graphic VS Movie Clip
If we want to use AS3.0 to interact with your symbols/objects, we need to set the type of your symbol to Movie Clip; the fundamental difference between Graphic and Movie Clip Symbols is that graphic symbol animates with timeline whereas Movie Clip symbol animates independent of timeline.
Here is a flash movie shows you the difference between Graphic and Movie Clips; you can click on STOP to stop the timeline from playing as well click on PLAY to resume the playback on the timeline.
Instances and Naming Convention
As I mentioned before, in order to access a stage element, we need to give it an instance name; you might find we already give it a name when we convert it to a movie clip. However, that name cannot be referenced by AS3.0 at all. So under the properties inspector (keep the onstage movie clip selected), you can type in a name.
Once you gave a name to a Movie Clip symbol, it become a unique instance; by calling the instance name in AS3.0, we can add all kinds of functions and events to it.
Action Script 3.0 is CASE SENSITIVE!
One thing you need to pay attention to is that do not start any instance name with a capital letter; the main reason is that there are many keywords in AS3.0 starting with capital letter. An instance name starting with capital letter would confuse Flash and cost all types of strange errors.
For the purpose of organization and debugging, especially when you work with a team, if your code is written with random variable names, it will be a big headache when you or your colleagues try to revisit/fix your code.
The major advantages of conforming to a certain set of naming convention are:
1. To reduce the effort needed to understand your code
2. To help formalize expectations and promote consistency within a development team
3. To enhance clarity in cases of potential ambiguity
4. To enhance the aesthetic and professional appearance of work product (wikipedia)
The typical naming convention in AS3.0 is usually like this:
If you have a stage element which will function as an interactive button, you should start with btn/button (usually, you do not start an instance with capital letter) then goes the name you have for your button.For example, a round shape button should be named "btnCircle"; if you have more than one same kind of buttons on stage, you should add a number after the name like "btnCircle1" or "btnCircle2"
If you have a movie clip element, you should start with mc/m. For example, a movie clip contains an animation of jumping bunny we could name it "mcBunny" or "mcJumpBunny"
If you have multiple scenes, then elements on different scenes should be able to be identified from the name. For example, a movie clip contains a ball in scene 1 could be named "mcBall_Scene1"
Last but not least, an instance name cannot contain special characters such as exclamation point, question mark, etc.
Dot Syntax and Accessing Properties
In AS3.0 everything is structured with the Dot Syntax. Basically, it starts with your instance name, next a dot, and then you put properties/functions. So we have two parts in our Dot Syntax, the first part refers to which elements we want to access and the second part refers to what we want to do with it. To put it simple, you can think of the first part as "the who" and the second part as "the what"
*To follow along the workshop, please download flash_lesson2.zip, extract to your desktop and open 0_dot_syntax.fla
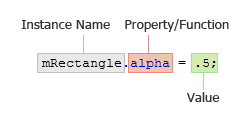
For examples, the instance name of the yellow rectangle is "mRectangle" if we want to reduce the opacity to 50% , we can use the alpha property.
mRectangle.alpha = .5;
Note that every executable line in AS3.0 should be ended with a semi-colon.
More common properties can be find under the action script panel in Flash, AS3.0>>Flash.Display>>MovieClip>>Properties
What is a Function?
A function is a reusable block of code that will perform certain actions.
*To follow along the workshop, please open 1_functions.fla
To create your own function, simply type in:
function myFunction():void {

  trace("My function is working!!")

  }
To use the function you just wrote, just type in
myFunction();
Note here that trace() is a build-in function come with AS3.0 that displays certain values in output window; stop() is also a build-in function that uses to stop the playback of the timeline.
Events and Event Listener
If we ever want to add interactivities to the buttons, we need to define an Event that happens and link the event to our buttons. So every time we interact with the buttons by clicking or hovering, it does the something we expect to happen.
For example, if we want to create button that directs us to a website when we click on it, we need to create an event that direct us to a website, then we create a button, then we add the event to the button.
*To follow along the workshop, please open 2_URLRequest.fla
Making a Button
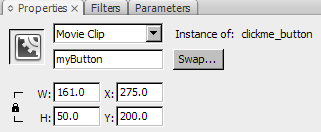
On the stage, we have a movie clip with "myButton" as its instance name;
These lines in the action panel make "myButton" act like a button; that is when you hover your mouse on it, the cursor turns into a hand icon.
myButton.buttonMode = true;

myButton.mouseChildren = false;
URL Request
Next, we write a function named "clickHandler" that directs the page to a certain web address. "http://www.sfu.ca" navigateToURL(myLink, "_blank") specifies the URL and as well as the target frame of the action(just like the target frame properties in HTML).
function clickHandler(evt:MouseEvent):void

{

	var myLink:URLRequest = new URLRequest ("http://www.sfu.ca");

	navigateToURL(myLink,"_blank");

}
The last step is to add an event listener to our button, so it will perform the function when we click on it.
myButton.addEventListener(MouseEvent.CLICK, clickHandler);
Basic Timeline Control
*To follow along the workshop, please open 3_Events_Buttons.fla
You probably have noticed that in each one of my files, all the codes are placed on the first layer and there is nothing on the action layer. The reason I am doing this is that when a SWF file being loaded onto your computer, it begins with the top layer. Since my codes might alter the stage elements later, you do not want you audience to see the pre-composed state of your project. More importantly, every time I visit my code it will save me a huge amount of time on searching if all codes are on the top layer.
Enough talking on project organization, let us get back on the coding. In this file, we want to add roll over/out effects to our button and also make it control the timeline of the bouncing ball.
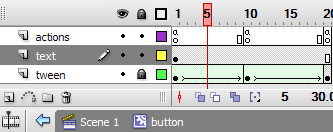
1. Double click on the movie clip "button" in the library to open the movie clip symbol; basically, it is an animation of the background color goes from grey to green then comes back to grey again. On each keyframe, there is a stop() function to make it stop, so we will be able to control it with our own action script.
2. In the action panel, these codes defines the function for roll over/out effects through controlling animation playback inside of "myButton"
function buttonOver(evt:MouseEvent):void{

	trace("mouse over");

	myButton.gotoAndPlay(2);

}


function buttonOut(evt:MouseEvent):void{

	trace("mouse out");

	myButton.gotoAndPlay(13);

}
3. Next, let us add the roll over/out effects to "myButton" using event listener;
myButton.addEventListener(MouseEvent.ROLL_OVER,buttonOver);


myButton.addEventListener(MouseEvent.ROLL_OUT,buttonOut);
4. Then we need to have a function that controls the timeline in the "mcBouncing" movie clip, so when we click on the button the animation will play. Also, we need to put a stop in the bouncing animation.
function buttonClick(evt:MouseEvent):void{

	trace("click!");

	mcBouncing.gotoAndPlay(2);

}
5. Finally, link the timeline control function to "myButton".
myButton.addEventListener(MouseEvent.CLICK,buttonClick);
Exercise: Complete the Flash Gallery
In the final part of this workshop, you are going to use the knowledge you have learned on AS3.0 and complete the flash gallery.
*To follow along the workshop, please open 4_BuildingYourOwnFlashSite.fla
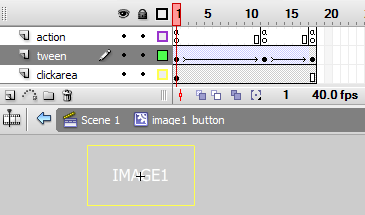
Two fully function buttons has been created, you will need to turn the static texts "IMAGE3", "IMAGE4" and "IMAGE5" into interactive buttons. Also, you need to customize the roll over/out effects of those buttons, then add the image loader function to the buttons and make them load different images.
Before you start it, here is a brief explanation
1. Creating buttons
btnImage1.buttonMode = true;

btnImage1.mouseChildren = false;


btnImage2.buttonMode = true;

btnImage2.mouseChildren = false;

// Making buttons function like a button


function btnOver(evt:Event):void {

	evt.target.gotoAndPlay(2);

}


function btnOut(evt:Event):void {

	evt.target.gotoAndPlay(13);

}

// Defining the events for rollover/rollout effects
Notes that evt.target will automatically deprive the instance name and place it in the function
2. Create roll over/out effects using tween animation
3. Write a function to control the ROLL_OVER/ROLL_OUT effects;
function btnOver(evt:Event):void {

	evt.target.gotoAndPlay(2);

}


function btnOut(evt:Event):void {

	evt.target.gotoAndPlay(13);

}

// Defining the events for rollover/rollout


btnImage1.addEventListener(MouseEvent.ROLL_OVER, btnOver);

btnImage1.addEventListener(MouseEvent.ROLL_OUT, btnOut);


btnImage2.addEventListener(MouseEvent.ROLL_OVER, btnOver);

btnImage2.addEventListener(MouseEvent.ROLL_OUT, btnOut);

// Adding the rollover/out events to btnImage1
4. Place each image in different FLA files, create a intro-animation (such as fading in effects) and export as SWF files.
5. Create the function to loading external SWF files to stage
function imageLoader(evt:MouseEvent):void {

	var myrequest:URLRequest = new URLRequest(evt.target.name + ".swf");

	// external image name must be "yourInstanceName + .swf"


	var myloader:Loader = new Loader();

	myloader.load(myrequest);

	stage.addChild(myloader);

	myloader.x = 0;

	myloader.y = 72;

}
6. Add the loading Function to MouseClick Event
btnImage1.addEventListener(MouseEvent.CLICK, imageLoader);

btnImage2.addEventListener(MouseEvent.CLICK, imageLoader);