Features
Manage User Permissions
For editors and managers
The Manage User Permissions feature allows you to give, edit, and remove a person's access to the Outlines app. When setting up a person's permissions, you will:
- choose which outlines they can edit, and
- assign a role, which determines the features they will have access to.
Providing Access to the Outlines App
- Click the Manage User Permissions option on the home page.
- Click
 ADD NEW at the bottom of the page.
 - The User Permission Details dialogue box will appear. In the Computing ID field, enter the user's computing ID and hit return. The user's name should appear in the field beside the computing ID.
- If you manage outlines for one department, the department code (e.g., ENGL) should already appear in the department field. If you manage multiple departments, you will be presented with a dropdown menu to select the department.
- Optionally, specify the year, term, number and section that you wish to give the user access to. To give the user access to the same outlines as you— e.g., all of the course outlines in your department—do not fill in any of these fields.
Note: The less specific you are, the more power you are delegating to another user. You can only delegate the same level of access as you have. It is not possible to assign access to an outline you don't have access to.
- Leave the Role drop-down at the Course Outline Editor option. This is the most common role you will assign to a user.
- Click the Submit button. Within 15 minutes, the user will have access to the Outlines app.
Editing User Access
To change a user's permissions, click the Edit button  beside their name.
Removing User Access
To remove a user you have previously given access, click the Delete button  . When the dialogue prompt appears, click OK.
Departmental Notes
For managers only
Edit Departmental Notes
This feature allows you to add and edit the departmental notes section that appears on the bottom of all of your department's course outlines. Complete the following steps to add/edit the departmental notes:
- Click the Departmental Notes option on the home page.
- Select the year/term and department.
- You will see two text areas, one for Undergraduate and the other for Graduate course outlines. Add the departmental notes here.
- Once you're finished, click Save.
Notes: Departmental notes automatically roll over each term. If you update the departmental notes for the current term be sure to make the same edits for all subsequent available terms.
Departmental Settings
For managers only
Change Moderation Settings
By default, all outlines must be approved by a departmental manager before they can appear on the live site. If you would prefer to give Editors the ability to activate their own outlines, uncheck the "Outlines are moderated" checkbox. This setting applies to all terms.
bulk migration
The bulk migration feature allows you to copy over previous outlines to an upcoming term. The application will search for historical outlines that match courses to be offered in the upcoming term. For example, if PHIL 100 D100 was offered in Spring 2015, it would be eligible for migration to the Summer 2015 term's offering of PHIL 100 D100. If there was no offering of PHIL 100 D100 in Spring 2015, but one was offered in Fall 2014, the Fall 2014 outline would be eligible for migration to Summer 2015.
Important note: Only the "additional" information that a faculty member or departmental editor has contributed will be included in the migration. Term-specific information such as the class schedule, location, instructor and exam schedule will be pulled from SIMS.

To begin the bulk migration process, click on the Departmental Settings button on the Course Outlines application home screen and select the term you would like to migrate to in the dropdown menu and click "Continue". If your department has a large number of course offerings each term, this initial step may take up to two minutes to complete.
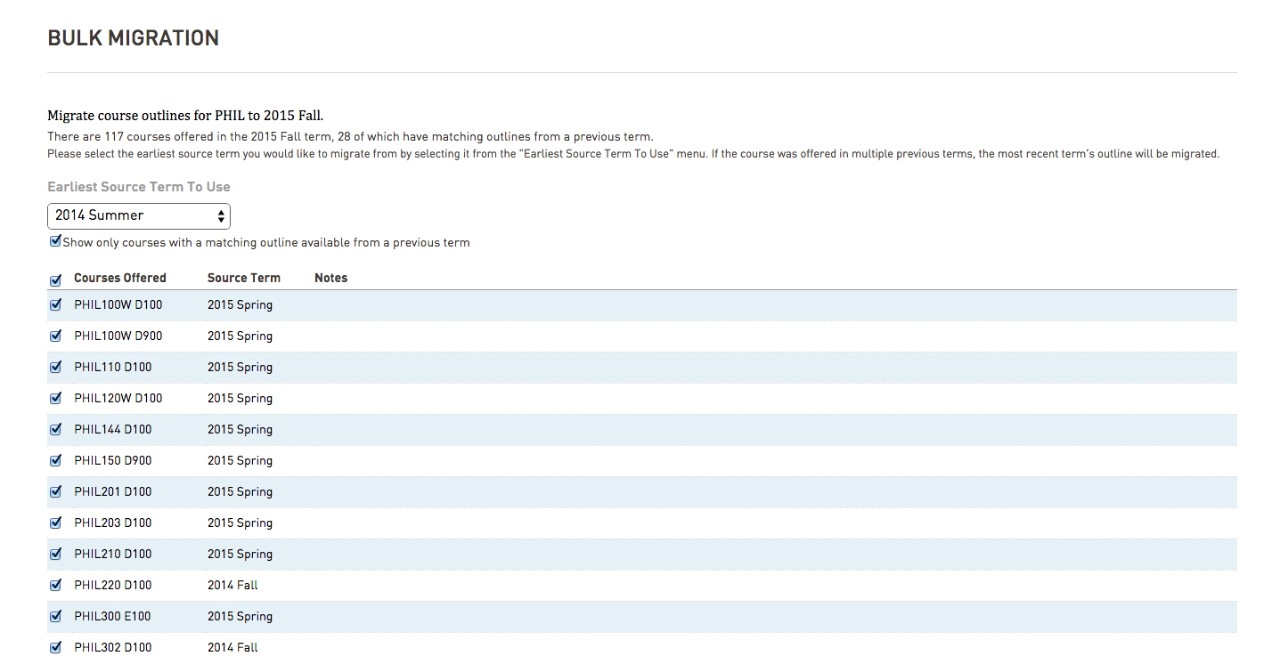
The Course Outlines application will check to see how many courses are to be offered in that term and how many matching outlines are available from a previous term. By default, the system will search for outlines up to two years previous to the target term. To limit this to more recent outlines, select your preferred term from the "Earliest Source Term to Use" dropdown menu. If a matching course was offered in multiple previous terms, the outline from the most recent term will be used. This cannot be changed.
If you do not wish to migrate a particular outline from the list, simply de-select the checkbox beside the course section. To proceed to the next step, click the "Continue" button at the bottom of the screen.
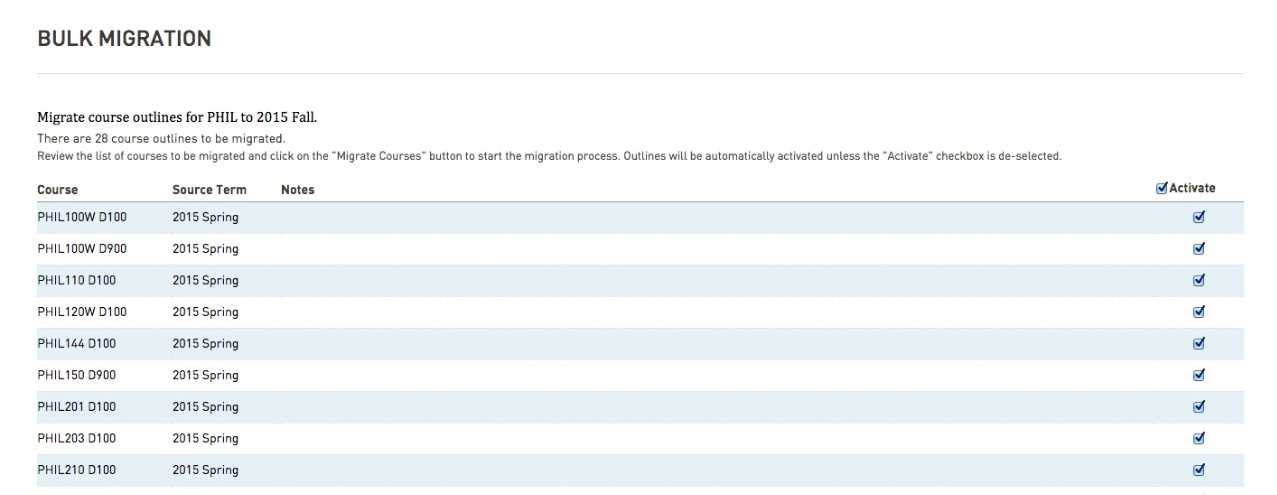
When an outline is migrated from a previous term, it will be automatically published (activated) so that it appears on the public website immediately. If you do not wish to activate the outlines at this stage, de-select the "Activate" checkbox in the far right column. You can also select individual outlines to exclude from activation. When you are finished reviewing the list, click the "Migrate Courses" button at the bottom of the page.
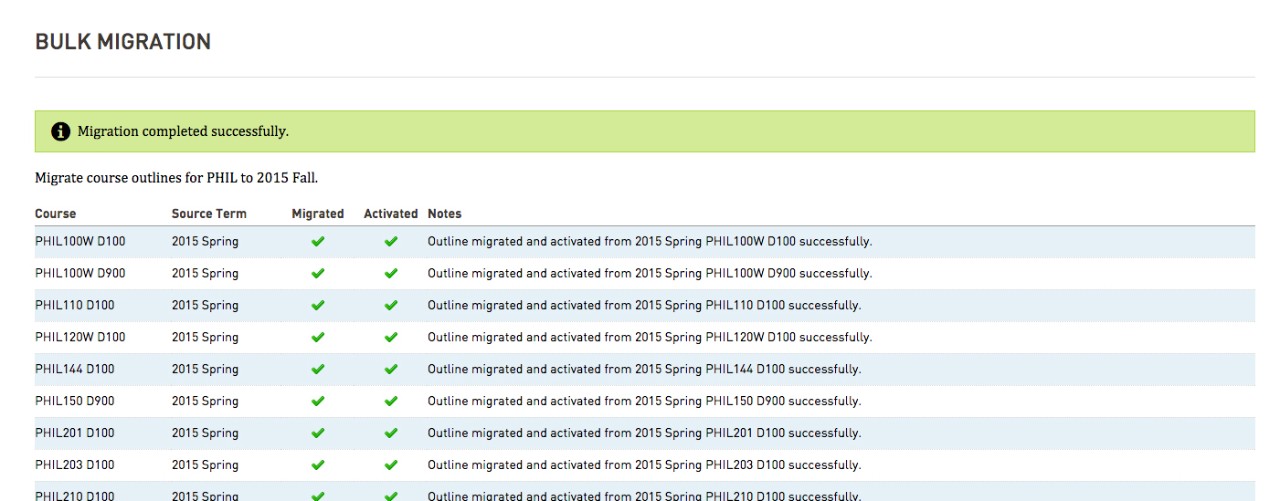
A success message will appear when the migration process is complete. The Notes and Source Term columns indicate which term was used to populate the new course outline.