Using Tags
What is a tag?
A tag is a piece of metadata assigned to content. Tags can be applied to both pages and assets. You can think of tags as keywords or labels that an author attaches to some content in order to make it easier to find, use or understand.
Tagging allows authors to attach keywords to content. Within AEM, tags can be classified into a number of categories called “namespaces”. These namespaces typically correspond to an individual department’s site.
Each new site is provisioned with its own namespace; an institution-wide namespace is also used for tagging global assets — e.g., commonly-used photos and icons.
What are the benefits of using tags?
Tags can be an effective means of organizing your AEM pages or assets. By tagging your assets (PDF documents, images, etc.) you can make them easier to find using AEM's Content Finder. As an author begins typing a keyword in the Content Finder, suggested tags will appear in a drop-down menu. The author can then select that tag to see a listing of all assets with the associated tag.
How are tags used?
Tags are often used in conjunction with List components. SFU News uses a List component to display links to pages that have been tagged with a particular category name. See www.sfu.ca/sfunews/community.html for a list of stories that have been tagged "Community", for example.
Once a page has been tagged, you can use the Show Tags component to display those tags directly on the page. You can choose between displaying the first tag, or all tags associated with that page.
Nesting tags to create a taxonomy
AEM allows users to build tag hierarchies—or taxonomies—wherein a number of tags can be nested under a parent tag. This allows for the creation of tagging taxonomies. For example, the tag “volleyball” may be nested under a more generic tag of “sports”; a tag for “student orientation” might be nested under “events”, and so on.
Tagging best practices
- Tags should be meaningful and readable to the end user. Consider that your tag may be displayed on a web page as well as used to organize content.
- Create a tagging taxonomy that makes sense for your department. Use nested tags to illustrate hierarchical relationships.
- If you are tagging content for use by authors outside of your department, consider providing a reference sheet.
Organize and Display Pages & Links

Each website has its own corresponding tag folder, i.e., namespace. You will see a folder labeled with the name of your website.

2. Click and select your website's namespace on the left.

3. Click Create near the top of the right panel, and a menu will appear.

4. Enter the following information for the new tag:
- The Tag Name is the keyword that will be attached to the asset or page when it is used. Typically, it is in lowercase letters.
- The Title is what will be displayed in certain components (e.g., Categories in a blog will display the titles). Both the Name and Title of a tag are required fields.
- The Description is an optional field, and is not displayed when the tag is used, but allows you to enter more information about the tag and its usage.
Once you have finished entering the required information, click Create to create the new tag.

Creating a Nested Tag
Nested tags are created the same way as regular tags. The only difference is you must first navigate to and select the parent tag. Thus the parent tag must already exist before creating the nested tag.
1. Click the "+" icon beside your website's namespace to display the first level tags.

2. Select the parent tag you wish to create the nested tag under. In this example, the parent tag (Sports) is one level deep. However it's possible to have a parent tag that is multiple levels deep, in which case expand the lower level tags until you can select the desired parent tag.

3. Create the nested tag by following steps 3-4 of How to create a tag.
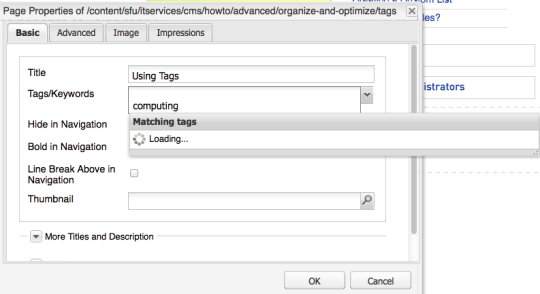
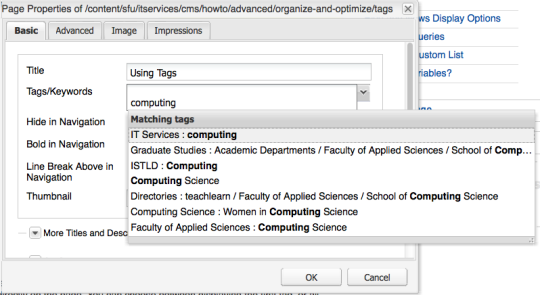
2. In the Tags/Keywords text field, type in the name of the tag and wait for the tags to load.
3. From the list of Matching Tags, select the appropriate tag name.
4. Click ok.
If you would like to display the tag on the body of the page, drag and drop a Show Tags component from the sidekick menu.