
- Get help
- Services
- Announcements & alerts
- Service outages
- Security alerts
- Major initiatives
- Building a connected campus with MS Teams
- Modernizing IT for a better SFU
- Improving speed and coverage with network upgrade program
- Using automation to drive efficiency and innovation at SFU
- Welcome to the new SFU Mail: now faster, secure, intuitive
- Reintroducing IT ServiceHub: Your One-Stop IT Support Platform
- Supporting SFU's Digital Transformation with Exchange Online
- Important changes to SFU email practices
- Transforming the SFU experience through digital improvements - Key Initiatives in Progress
- Jovanna Sauro wins SFU Personal Achievement Award
- Improve your cellular coverage by enabling WiFi Calling
- New committee guides transformative changes at SFU
- Expanded identity options for students within SFU applications
- SFU works toward keeping devices out of landfills
- A journey to improved WiFi
- Help us, help you, connect to better WiFi
- IT Services' new support system: ServiceHub
- Information Security Essential Courses
- IT Services leadership announcement
- University Wide Password Change Initiative
- April 2021 technical issue
- Telephone System Core Infrastructure Upgrade
- Decommissioning fraser.sfu.ca
- About
- Information security
Step 2. Prepare & download files from SFU Vault
How to download files from SFU Vault (desktop app) and pepare for migration
There are 3 steps to preparing your Vault file for migration via the SFU Vault app:
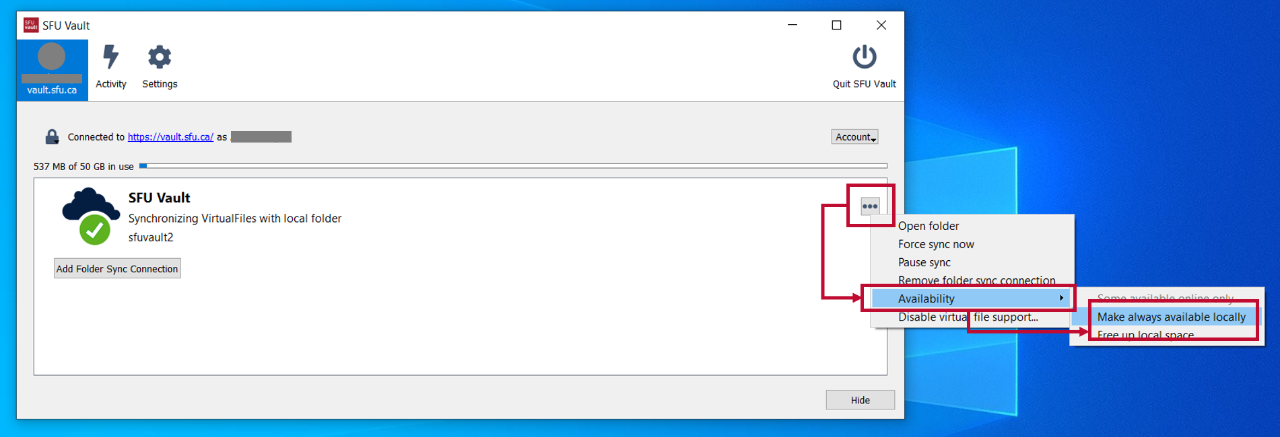
Step 1. By default, SFU Vault will not automatically download all your files locally to save space on your hard drive.
To ensure all your files are downloaded and saved locally, select “...” > "Availability" > "Make always available locally" to begin the download process.
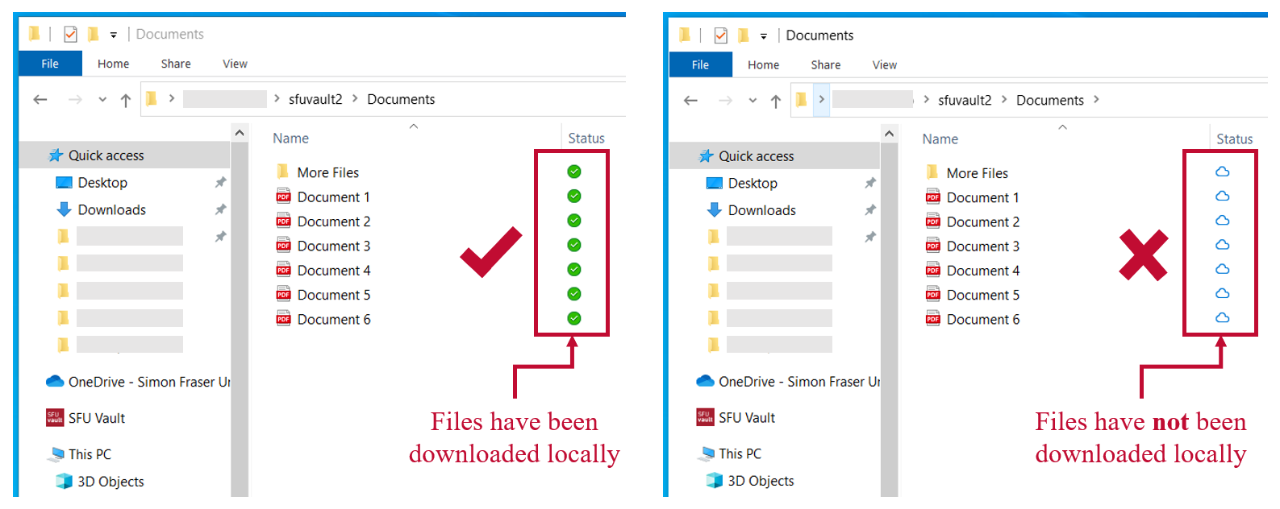
Step 2. Once the files are downloaded locally, you will see green checkmarks when you open your SFU Vault folder.
I have shared files. Should I download them?
To ensure access to your shared files, we recommend downloading all your shared files.
Depending on your situation, the owner of the shared files may mention that you won’t be required to migrate the file and will re-share the file post-migration. In that case, you may choose not to download the shared files
If you own shared files, you will need to download your files and share them to users again once you have migrated the files.
Step 3. Go to "Activity" > "Not Synced" tab to check for any unsynced items. Your files may be unsynced if the file name contains any special characters, such as " * : < > ? / \ |
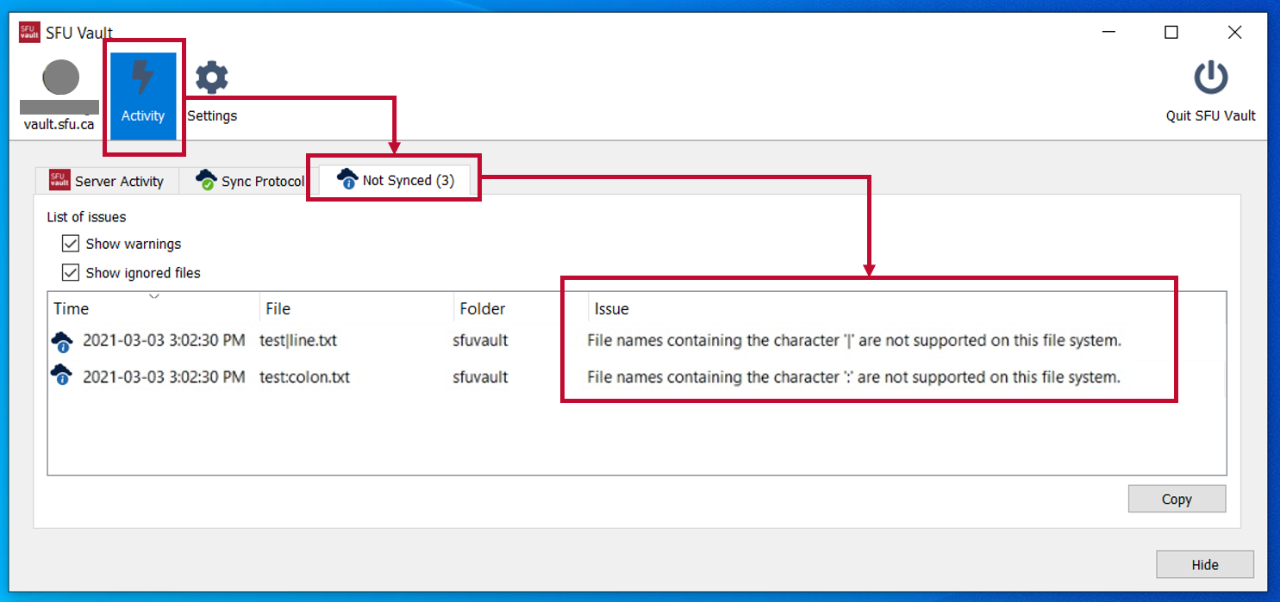
To resolve this error:
- Go to SFU Vault (https://vault.sfu.ca) on your web browser.
- Rename the files to remove special characters.
- Re-sync the files on the SFU Vault desktop app or download the files manually from SFU Vault on your browser.
Step 1. Right-click on SFU Vault icon from the taskbar and select "Open folder sfuvault".
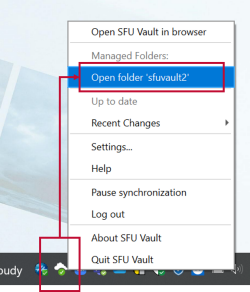
Step 2. Make a note of where is the folder located. This is important so you know where to find your files after pausing the sync in the next part.

Your file path on Window OS may look something like: "C:\Users\computingID\sfuvault2".
After confirming that all your files have been synced, it is recommended to stop the syncing function on SFU Vault desktop app before proceeding with the migration.
Step 1. Log out of the SFU Vault desktop app by right-click on "SFU Vault icon" on the taskbar > Select "Log out".
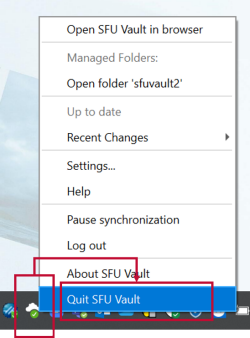
Step 2. At this point, your files will no longer sync to your SFU Vault account. You can choose to:
- Uninstall the dekstop app if you are using an individual-use device, or
- Quit the app if you are using a university-managed device.
Step 3. You are now ready to migrate the files to your choice of location:
- OneDrive is recommended for individual storage, or
- Microsoft Teams is recommended for collaborative groups; only available to staff and faculty.
Unsure which solution to choose? For recommendations on how to select the migration solution that matches your needs, go back to Step 1: Review possible migration options to review the options available.
Note: We recommend keeping your existing files on SFU Vault and even after completing the migration process. It is recommended to have files in SFU Vault as additional backup for the migration.